At Mixlr, we provide the simplest way of getting your audio out to your listeners. In other words, we are in the service of protecting you from the deep (yet wonderful) complexities of audio programming.
That said…if you are as geeky as we are about the technologies behind Mixlr’s simplicity, we welcome you to dive right into our new engineering tutorial series, written by Panos Matsinopoulos, full-stack software engineer at Mixlr (and the team’s own bright ray of sunshine).
Read on to learn about how to save the terraform state remotely, while making sure it can be used concurrently by many members of a team.
Tutorial: Using S3 As The Backend For Terraform State

Introduction
At Mixlr, we use Terraform as our tool of choice to declaratively define our infrastructure. It is our IaC tool. It allows us to deploy to any cloud provider and keep control of any changes and evolvement in our infrastructure, virtual and physical.
Terraform processes the definition file, usually main.tf, applies its content to our infrastructure and generates another artifact as output, usually terraform.tfstate, which is the current state of it.
By default, the state file is saved locally after the developer runs the command:
$ terraform applyHowever, this local persistence does not fit when working in a distributed team, with many devops engineers working in parallel on the same infrastructure. They need to have a way to share the terraform.tfstate file, which, by the way, should not be stored in the git repository.
This blog post is a tutorial type post that will show you how you can save the terraform.tfstate file on a remote and secure place, where it could be accessed by all the members of your team.
Architecture
Before we see the actual terraform definition file(s), let’s see a diagram of the solution to the problem.

As you can see from the picture above, when the engineer applies the terraform definition, at the end, the state is saved to an AWS S3 Bucket, and not locally.
In order for this architecture to function correctly, when multiple developers work on the same terraform repo concurrently, it needs to make sure that no two developers can mutate the S3 Bucket content at the same time.
This concurrency control is achieved by the use of a distributed lock based on AWS DynamoDB table, as in the following picture:
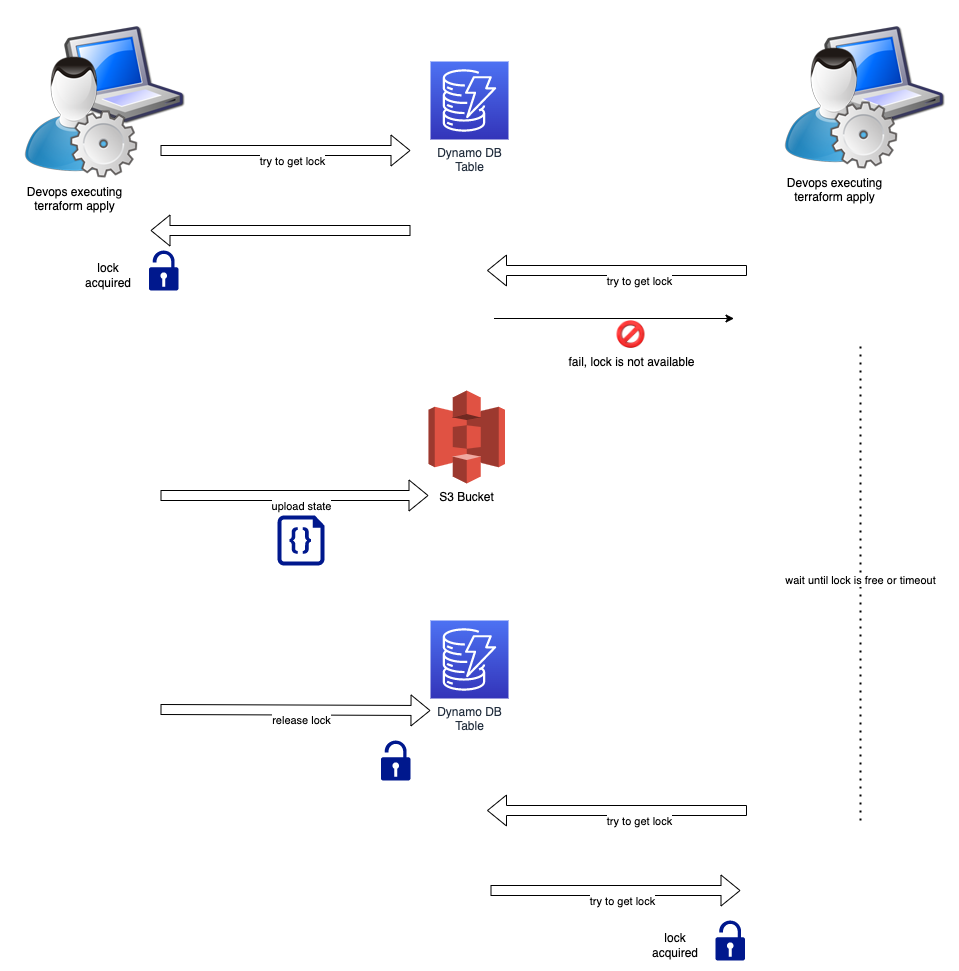
As you can see from the picture above, the terraform setup is configured so that when one developer tries to apply, it first needs to acquire a lock on a DynamoDB table. If the lock is not available, it means that another developer has already took it and is working on updating the terraform state in the S3 bucket. If the lock is free, then the apply command proceeds without problem and at the end the S3 bucket with the terraform state is updated and the lock is released.
Two Terraform Configuration Files
We will need 2 terraform configuration files:
backend_state/backend-state.tfmain.tf
Configuration for the S3 Bucket and DynamoDB Table (backend_state/backend-state.tf)
This file (backend-state.tf) will describe the S3 Bucket and the DynamoDB Table to be used for locking. We create it inside a folder with name backend_state.
File: backend-state.tf
We would like to draw your attention on the following:
- lines 12 – 15: You need to provide the correct AWS profile name. This is the profile that you have set up locally with credentials to allow you access to your AWS account.
- line 13: Give your bucket a unique name.
- lines 26 – 29: Make sure the bucket is protected with private acl.
- lines 31 – 36: Enable bucket versioning. Hence, in case a developer pushes a state that needs to be reverted it will be much easier to go back to a previous version.
- line 39: Select a unique name for the DynamoDB table.
- line 40 and 42 – 45: The hash key needs to be
LockID. Other values will not work. The type should beS, i.e. string type. - line 41: I would suggest the billing mode to be
PAY_PER_REQUEST, since this table will not be used continuously.
Apply the backend state terraform configuration:
With the backend_state/backend-state.tf file ready, you need to apply it:
$ terraform -chdir=./backend_state applyNow, you are ready to go for your main.tf file that will be using the previously created backend for the state storage.
Main Configuration
Here is an example of a main.tf file that uses the distributed backend:
The above configuration creates an EC2 instance. The whole point though is the backend declaration between lines 2 and 8. The backend is "s3" and it declares the bucket and the dynamodb table that is used to allow for concurrency control on state change.
Closing Note
This was a tutorial-type post to teach you about how you can use AWS S3 backend as the terraform state storage.
I hope that it was useful to you. But again, I always learn from you more than you might learn from me. Hence, your comments are more than welcome.
Thank you and see you soon on the next post.