AWS Lambda Function To Produce Kafka Events

Part 1 – Objectives, Audience, Tools & Prerequisites
Part 3 – Using JavaScript Client To Produce and Consume Events
Part 4 – AWS Lambda Function To Produce Kafka Events
Part 5 – AWS API Gateway For Accepting Events
Part 6 – Consuming Events Using MSK Connect – S3 Bucket Sink
Part 7 – Consuming Events Using AWS ECS
Part 8 – Storing Consumed Events Into AWS RDS
Introduction
In the previous part of this tutorial series, we have learnt how to create JavaScript Kafka Event Producers and Consumers. That knowledge is the foundation for the current, part 4, tutorial, in which we integrate the Producer functionality into an AWS Lambda function.
We will learn
- how we create an AWS Lambda function
- how we deploy it using Docker and Terraform, and
- how we test it
Architectural Objective
The following diagram shows the practical architectural objective of this tutorial:
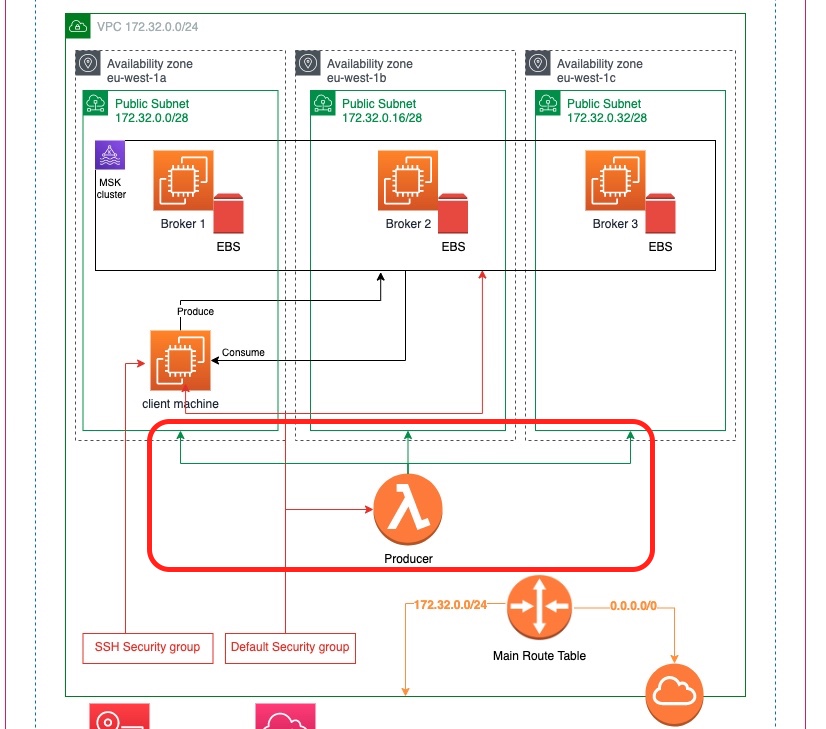
We are building on top of what we have already built in Part 2.
- We will create an AWS Lambda function that will reside inside the VPC of the brokers.
- It will have access to all subnets.
- It will belong to the same security group, the default security group of the VPC.
Let’s start.
Event Producer JavaScript Code
Folder for the Lambda Code
Inside our working folder we first create a folder to hold the code of our lambda function.
$ mkdir live_listening_event_producerInitialize The JavaScript/Node.js Project
We cd to live_listening_event_producer and we initialize the Node.js project using yarn.
$ yarn initMake sure that the entry point is app.js and that the type of the project is declared as module. The module type will allow us to use ES modules rather than CommonJS modules.
This is the package.json file that should be generated:
Add kafkajs Package
Exactly as we did in the previous part, number 3, we will incorporate the use of the package kafkajs. We use yarn to add it to the project:
$ yarn add kafkajsThat is the only dependency that we will need, which keeps our package.json quite simple:
Install NPM Package Dependencies
With the package.json having the dependencies that we need, we install them:
$ yarn installThe Producer Code
We then write the producer code inside the file app.js:
The producer code we are writing now is quite similar to the code we wrote in the previous part, here. Here are the most important parts of it:
- The list of Kafka brokers’ URL for connection of the producer to Kafka is provided as a comma-separated list via an environment variable with name
KAFKA_BROKERS. Remember how we get this value from the AWS MSK Dashboard. We have explained that in Part 2. However, we will not need to copy and past this value from the dashboard. Terraform will make sure that it provides it to us automatically as soon as the MSK cluster is ready. - The topic name is given as an environment variable. Hence, it will be easier to change without redeploying.
- lines 19 – 24: The connection of the producer is wrapped inside a
try { } catch { }block. Hence, if we can’t connect we will be able to report this back to the Lambda run-time environment as an error condition. This report is done inside thehandleron line 30. - The
app.jsmodule needs to export a function that will be called for by the Lambda run-time environment. The function exported is calledhandler. - The
handleris anasyncfunction that returns aPromise. - lines 28 – 31: The Promise will
reject()if there was a connection error. - lines 32 – 53: Otherwise, it will call
producer.send()to publish an event. Note that we expect the incoming event (variableevent) to have a property with namebroadcastId. We use that as thekeyof the message and as part of itsvalue. - If everything goes well, we call
resolveand we return an object with the propertystatushaving the value200. This structure of the object is not mandatory. We could have returned any object we liked.
Dockerize Producer Code
We are going to create an AWS Lambda function using the Image package type, i.e. we are going to provide a Docker image with our lambda function inside.
In order to achieve this, we need to create a Dockerfile that will prescribe how our image should be built. Here it is:
- line 1: We use one of the publicly available AWS images that have been built for the particular purpose of hosting lambda run-time environments. You can find them here.
- line 3: We install
yarn. - line 5: We copy the
package.jsonandyarn.lockto the folder where our lambda code needs to reside in, i.e. to whatever the value of the environment variable${LAMBDA_TASK_ROOT}is. - line 7: We install the package dependencies
- line 8: We copy over our lambda function code, i.e. the
app.jsfile. - line 9: We specify the arguments to the default entry point. This should follow the
<file>.<exported_function>pattern. In our caseapp.handler.
Test Function Locally
Before we deploy our lambda function to AWS, we would like to be able to test it locally. In order to do that, we will also need Kafka running locally.
In the previous part of this tutorial series, part 3, when we wanted to test the producer and the consumer locally, we downloaded Kafka to our machine. In the current part 4, we will not do that. Since our lambda function will be running inside a Docker container, we think that it is much easier if we use a Docker container for Kafka too. Actually, we will use two containers, one for Zookeeper and one for Kafka. We will only have to make sure that all three containers can talk to each other. We can use Docker Compose for this purpose.
Docker Compose for Local Development/Testing
Here is the Docker Compose file that we use. We name it docker-compose.development.yml to make sure it is obvious that it is only used for local development purposes.
- lines 2 – 12: This is the service specification for our lambda function. It depends on the
kafkaservice. Thekafkaservice needs to be inhealthystate before this (live_listening_event_producer) service can start. The image, when not available, is built using local (.)Dockerfileand it is tagged with the tag specified on line 6. When the container runs, it exposes its internal port8080as port9000. Also, theKAFKA_BROKERSenvironment variable takes a value that will allow our lambda function to locate the Kafka broker. Finally, we give theTOPIC_NAMEas environment variable in order to avoid hard-coding the topic name into the lambda producer code. - lines 14 – 26: This is the Zookeeper service specification. Note that this docker compose service has a
healthcheckspecification that relies on the programnetcat(nc). It will check that the zookeeper server is listening for connections on port2181before consider it a healthy docker compose service. - lines 28 – 46: This is the Kafka broker service specification. This depends on
zookeeper. Note thatzookeeperneeds to be inhealthystate before the kafka service will start. We also specify thehealthystate of thekafkaservice itself (usingnetcat(nc) again), because this is needed aslive_listening_event_producerservice relies on thehealthytest of thekafkaservice.
Run Locally
Assuming that we have Docker server up and running locally, it is very easy to start the lambda function and Kafka containers.
$ docker-compose -f docker-compose.development.yml up -dThis will also build our lambda function image first. It will also tag the image with the tag msk-demo/live_listening_event_producer_lambda.
With everything up and running, we have a Docker architecture which looks something like this:
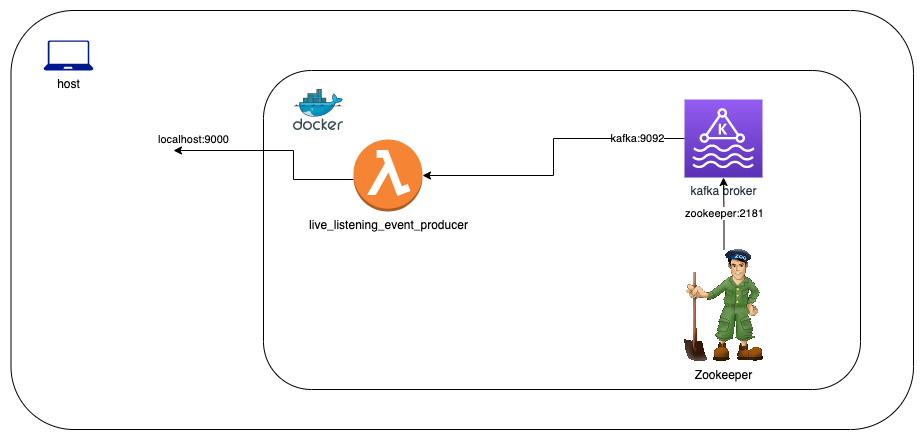
The lambda function container exposes a REST endpoint that we can use to send POST request for testing the lambda function.
Create Kafka Topic
But, before we test our Kafka producer, let’s create the topic first:
$ docker-compose -f docker-compose.development.yml exec kafka kafka-topics --bootstrap-server kafka:9092 --create --topic ${TOPIC_NAME}The above command will create the topic with name live-listening-events, which is the name of the topic our Kafka producer is supposed to be publishing an event into (based on the value of the environment variable TOPIC_NAME).
The above command runs successfully and we see this:
Created topic live-listening-eventsWe can confirm the presence of the topic by running the following command:
$ docker-compose -f docker-compose.development.yml exec kafka kafka-topics --bootstrap-server kafka:9092 --listThis command confirms the presence of the topic by printing:
live-listening-eventsProduce an Event
With the topic present let’s use curl to send a POST request to our lambda function:
$ curl -v -X POST "http://localhost:9000/2015-03-31/functions/function/invocations" -H 'Content-Type: application/json' -d '{"broadcastId": "123"}'The above request is invoking the lambda Kafka producer code which creates an event inside Kafka database.
Confirm Presence Of Event in Kafka Database
We can use the following command to get the number of events present in the Kafka topic:
$ docker-compose -f docker-compose.development.yml exec kafka kafka-run-class kafka.tools.GetOffsetShell --bootstrap-server kafka:9092 --topic ${TOPIC_NAME}It prints:
live-listening-events:0:1The 1 at the end is the number of events in the topic. We try one more curl invoke and then we confirm that this number increases from 1 to 2.
Test Consumption of Events
We can even use the standard Kafka console consumer to consume the events we have produced and confirm that they have stored and can be consumed successfully.
We run the command
$ docker-compose -f docker-compose.development.yml exec kafka kafka-console-consumer  --bootstrap-server kafka:9092 --from-beginning --topic ${TOPIC_NAME}
This is event for broadcast: 123
This is event for broadcast: 345
We see the two lines corresponding to the two curl requests we sent (in the second request we used a different broadcastId). These lines are the value values of the event produced by our lambda Kafka producer.
Everything seems to be working fine. You can now bring Docker services down, they are no longer needed:
$ docker-compose -f docker-compose.development.yml downDeploy to AWS Account
We have tested our function locally. Now it is time to deploy to our AWS Account. For this process we rely, at least for now (later posts will improve this process) to two tools:
- Terraform,
- Docker, and
- AWS CLI, i.e. the AWS command-line interface
AWS Elastic Container Registry
AWS ECR (Elastic Container Registry) is the service that we use to save our lambda function Docker image into.
First we need to have a way to login to AWS ECR service. Otherwise, we will not be able to push our Docker image to that remote repository. For the login purposes we use the file null_resources.tf with the following content. This file, needs to be created in the same folder like the main.tf file:
This file declares a null_resource that has a local-exec provisioner. This provisioner is used to execute local commands using aws ecr and docker login. These commands logs us in and hence will allow our local execution session to interact with our AWS ECR later on.
Note the data.aws_caller_identity.current_user.account_id. This is how we get access to the AWS account id of the current user, i.e. the user that executes the Terraform apply command and have their credentials provided to the AWS Terraform provider for interaction with the AWS Account.
This data.aws_caller_identity resource is declared inside the file global_data.tf, which should exist in the same root folder:
Then we need to create the repository. In the same folder (our working folder) in which we have the main.tf file, we create the file named: live_listening_event_producer_lambda_ecr.tf with the necessary configuration to do the following:
- create the AWS ECR Repository
- build the Docker image, and
- upload the Docker image to the ECR Repository.
Here is the content of the file live_listening_event_producer_lambda_ecr.tf:
- lines 1 – 55: We declare only 1 resource inside this file. It is the AWS ECR repository we want to create.
- line 4 – 6: We create a dependency to the the
null_resourcethat takes care of our user logging in into AWS ECR. This dependency will make sure that the Terraform session will first execute the AWS ECR login commands and then the creation of the AWS ECR repository. - line 8: We set the
force_deletetotrue. Hence, anyterraform destroycommand will not fail if the repository has images inside. - line 8: We set the immutability of the image tags to
MUTABLE. This allows us to deploy a new image with a tag that has already been used in the past, like the taglatest. The tag is removed from the old image and it is now attached to the new image we upload. - lines 12 – 14: We enable the image scanning on upload. This will scan our image for security vulnerabilities.
- lines 16 – 20: We follow the best practice (see part 2 of the tutorial) to tag the AWS ECR repository with the correct tags for
environment,Nameandproject. - lines 22 – 40: All the above process creates the repository. The lines 22 – 40, they upload the docker image inside this new repository. We use the
local-execprovisionerwhich allows Terraform to execute commands on our local machine.- lines 22 – 25: We build the image. When we build we name our image (with the
-tflag) after the name of the repository, using${self.name}. - lines 27 – 30: We tag the image with the repository url and the
latesttag. This is necessary in order for thedocker pushcommand later on to know where to push the image to. - lines 32 – 35: We use the
aws ecr get-logincommand to login to AWS ECR service. This is where we use the current user account id as we can get it from${data.aws_caller_identity.current_user.account_id}data source. - lines 37 – 40: We finally push the image to the remote repository, with
docker push.
- lines 22 – 25: We build the image. When we build we name our image (with the
- lines 42 – 54: These are used when we destroy, i.e. when we call
terraform destroyto remove all the resources that our Terraform state includes. The destroy will remove the repository from AWS, but these extralocal-exec provisionerswill also remove the image from our local Docker repository. These last two command are not absolutely necessary and they don’t actually consume resources that cost money. Hence, they could have been avoided. We only include them here for completeness to make sure that, after aterraform destroy, we leave the things exactly as they were before theterraform apply.
AWS Lambda Function
The next piece of information that we need to configure using Terraform is the AWS Lambda function. We use the resource aws_lambda_function to define it.
We create the file named live_listening_event_producer_lambda_func.tf with the following content inside:
Before we explain in detail about what is going on inside this file, we give a diagram that depicts the relationship between the elements contained.
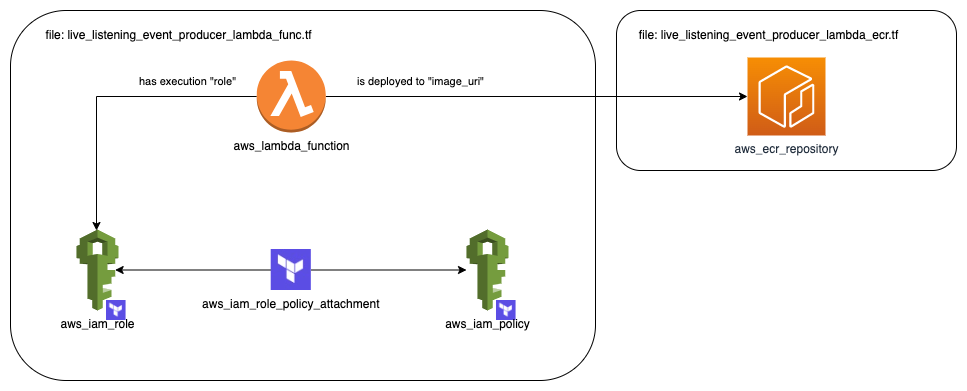
Our lambda function is defined using a aws_lambda_function resource block. One very important part that it needs is an AWS IAM Role to be attached to. This is created using an aws_iam_role resource block. This role will also need an AWS IAM Policy. The AWS IAM Policy is attached to the IAM Role via a resource block of type aws_iam_role_policy_attachment. Finally, the AWS Lambda needs to refer to the image inside the AWS ECR repository we are creating with the items defined inside the other file, i.e. the live_listening_event_producer_lambda_ecr.tf.
Let’s talk a little bit in more detail about the contents of the file live_listening_event_producer_lambda_func.tf:
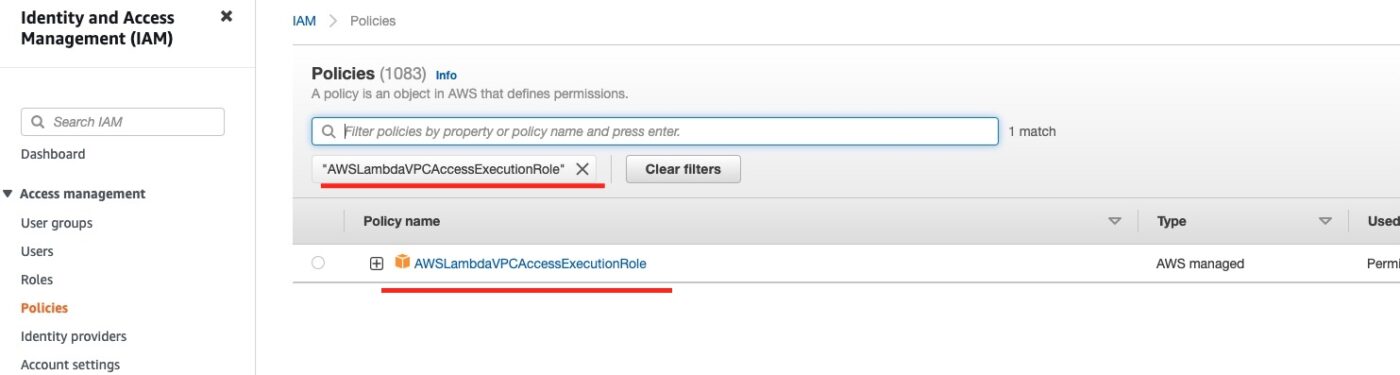
- lines 1 – 3: This is a data source referring to an existing AWS Managed IAM Policy. We refer to that policy by its ARN. If you open the AWS Management Console and visit the IAM Service, then go to “Policies” and search for the one with name “AWSLambdaVPCAccessExecutionRole”, you will locate this particular policy, like in the screenshot below:
If you expand to see the details of this policy you will see this:
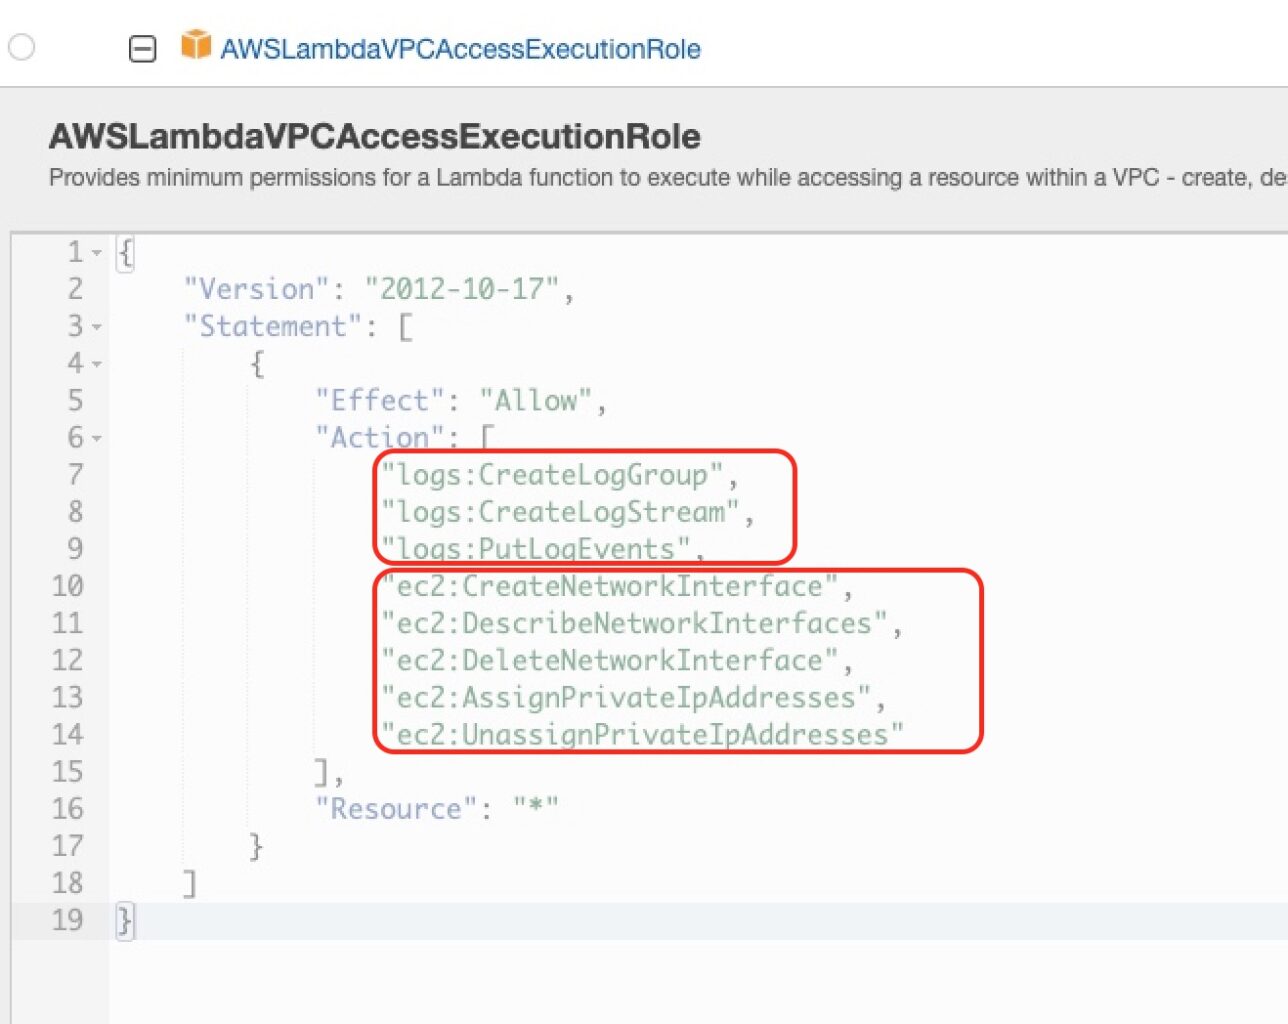
that it will give permissions that are related to the ability to write logs in CloudWatch and the ability to deal with EC2 network interfaces and private IP addresses. This latter part, will allow our Lambda function to connect to the VPC of our AWS MSK cluster and publish events, i.e. to talk to the MSK Brokers. If we don’t do allow these actions, then we will not be able to connect our Lambda to the AWS MSK VPC.
- lines 5 – 19: These lines they create the AWS IAM role that will be attached to our AWS Lambda function. This is also called an AWS Lambda Execution Role, because it has the
assume_role_policystatement. This part is necessary because this allows our AWS Lambda function to be executed/invoked by the AWS Lambda Service. Other than that, the AWS IAM Role is quite simple. It has anameand the necessarytagsto keep things organized. - lines 28 – 31: We have the AWS-managed IAM Policy and the AWS IAM Role, but they are not linked together, i.e. the IAM Role is not using this IAM Policy, until we use the
aws_iam_role_policy_attachmentresource block. This is very simple, because it only requires two items of configuration. Thepolicy_arnto refer to the IAM Policy and theroleto refer to the AWS IAM Role. When this resource is fulfilled, then the IAM Role will be allowed any action that the IAM Policy defines. - lines 33 – 58: This is the main block that defines our AWS Lambda function using the resource of type
aws_lambda_function.- line 34: This is the function name
- line 36: This is the execution role of the function. It needs to refer to the previously created resource.
- line 37: The
image_urineeds to refer to the image uploaded inside the AWS ECR Repository. The URI is constructed dynamically, using therepository_url of theaws_ecr_repositoryresource and then attaching the tag:latest, because this is how we tag the image when we push it to the AWS ECR Repository. - line 38: This is the package specification for our image. It needs to be
Imagebecause we use a docker image as the packaging method of the code of our Lambda function. - line 39: We set the
timeoutto 30 seconds. Note that the default is3seconds. We expect that the execution of our lambda function, normally, will be much faster than 30 seconds, but to in order to be on the safe side and make sure that our client has little chances to time out we set to 30 seconds. You can experiment to find the optimum timeout setting. We can always collect statistics from CloudWatch to understand how much time our Lambda function usually takes. - lines 40: We define the architectures our lambda code can run on.
- lines 41 – 46. As we saw in the Producer Code at the beginning of the post, our lambda function relies on the environment variables with names
KAFKA_BROKERS, to get the URLs of the Kafka brokers to connect to, andTOPIC_NAME, to know which Kafka topic to publish the event into.. These lines of terraform configuration here, they set up the value of these environment variables. The comma-separated list of Kafka broker urls, we get them as an output value of the AWS MSK Cluster resource, under the namebootstrap_brokers. TheTOPIC_NAMEvalue is set from the Terraform variablevar.topic_name. - lines 48 – 51: We attach our Lambda function to the VPC we build the whole demo in. We use the property
vpc_configand we specify thesubnet_idsand thesecurity_group_ids. For thesubnet_idswe define all the three subnets we use for our demo. For thesecurity_group_idswe specify only the default security group of the VPC. This security group allows all incoming and outgoing traffic within and amongst elements in the VPC. - lines 53 – 57: We use the best practice to tag our Lambda function with the project, name and environment specifying tags.
Terraform Apply
Everything has been defined inside the terraform configuration files. Now we are ready to apply this configuration.
Important: At this point and before you apply the terraform configuration, you should have prepared everything that Part 2 of this tutorial is talking about. In fact, you should have the following files already edited with the correct content:
- From Part 2:
client_machine.tflocals.tfmain.tfterraform.tfvarsvariables.tf
- From Part 4 (current Part):
live_listening_event_producer_lambda_ecr.tflive_listening_event_producer_lambda_func.tfnull_resources.tfglobal_data.tf
Having everything in place, we fire the Terraform apply command:
$ terraform applyIf this is run on a clean slate, i.e. with our Terraform state clean and empty, then it will create 16 resources. We are presented with the plan and we type yes to accept it and allow Terraform to apply it.
It will take some time to build the AWS MKS cluster (from 30 minutes to 60 minutes). But otherwise, the process is straightforward. If you had applied the Part 2 stuff before, then current terraform apply will suggest to create only the resources of this new Part 4 and application of the plan will be much faster.
Double-Check Application Results
After terraform apply command finishes, we do some visual checks to confirm that plan has been applied as expected. At least for the most important parts of the architecture.
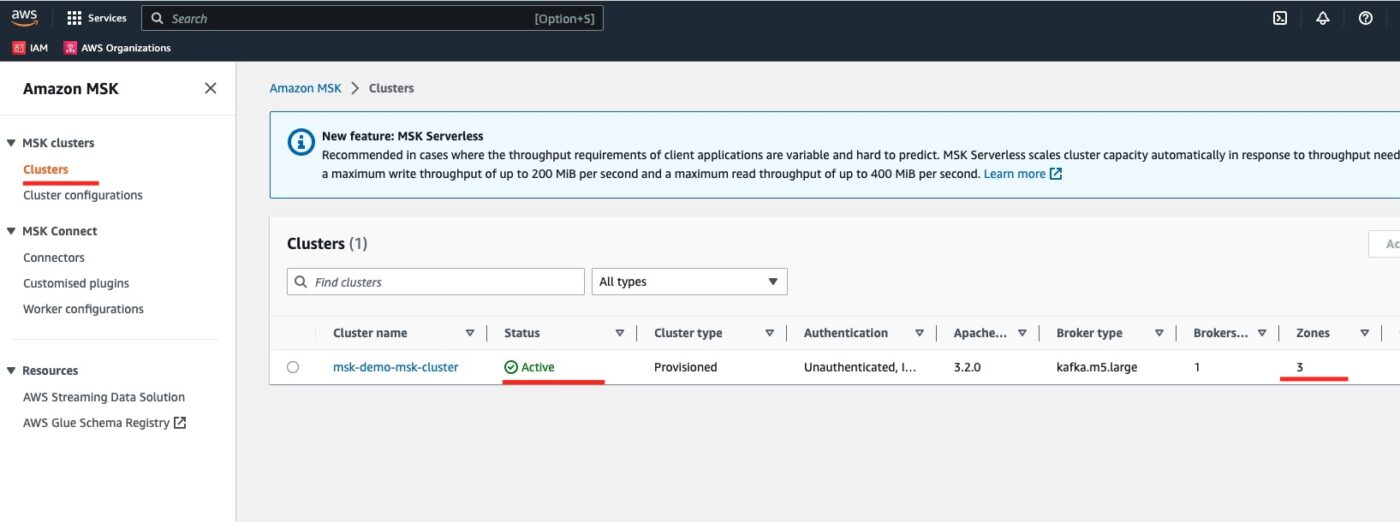
AWS MSK Cluster
We visit the Amazon MSK service and then we click on Clusters. We can see the msk-demo-msk-cluster in Active Status.
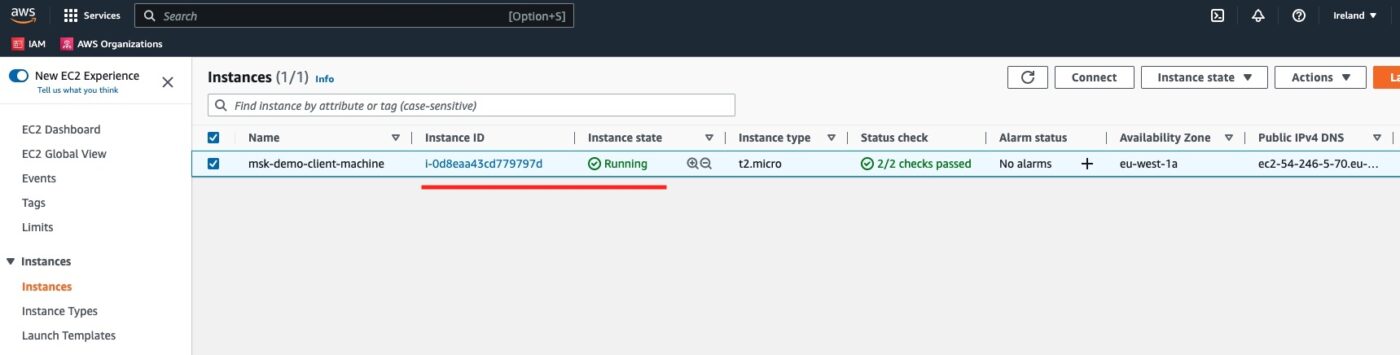
EC2 Client Machine
We visit the EC2 service instances list and we see the msk-demo-client-machine.
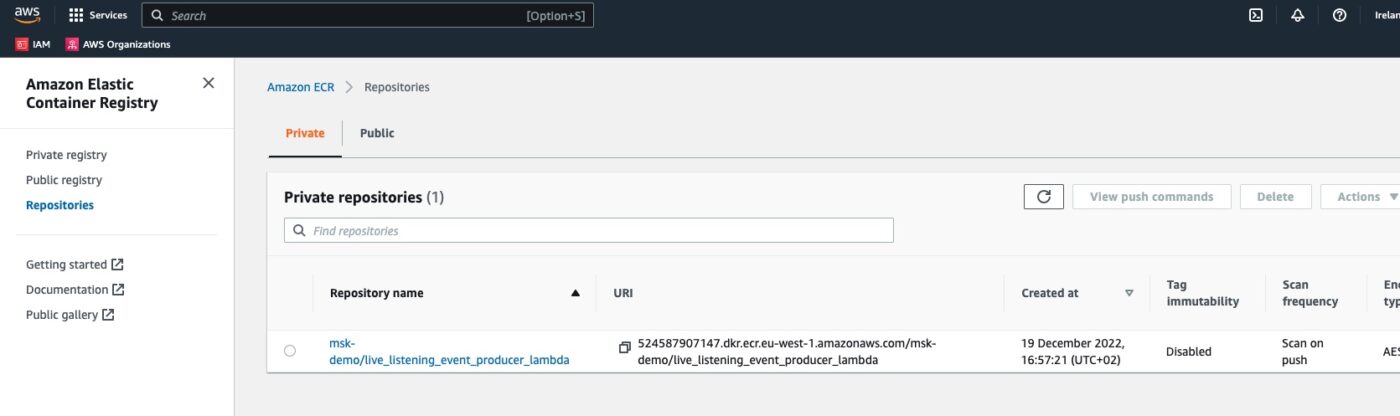
AWS ECR Repository
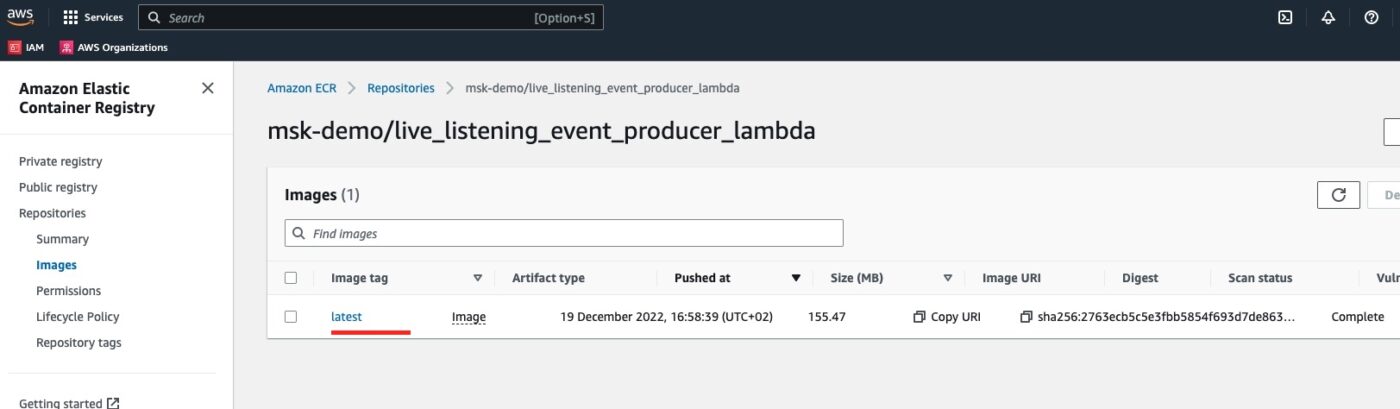
We visit the ECR dashboard and we can see the newly create repository:
If we click to get into the repository, we will see the docker image we have uploaded to it, with the latest tag:
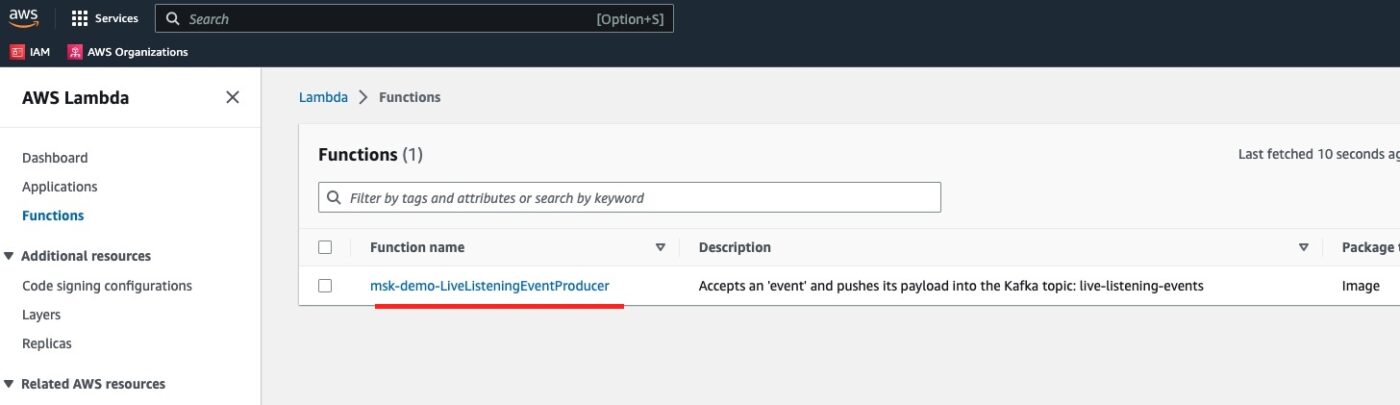
AWS Lambda Function
We visit the AWS Lambda service dashboard and we see our Kafka producer lambda function defined:
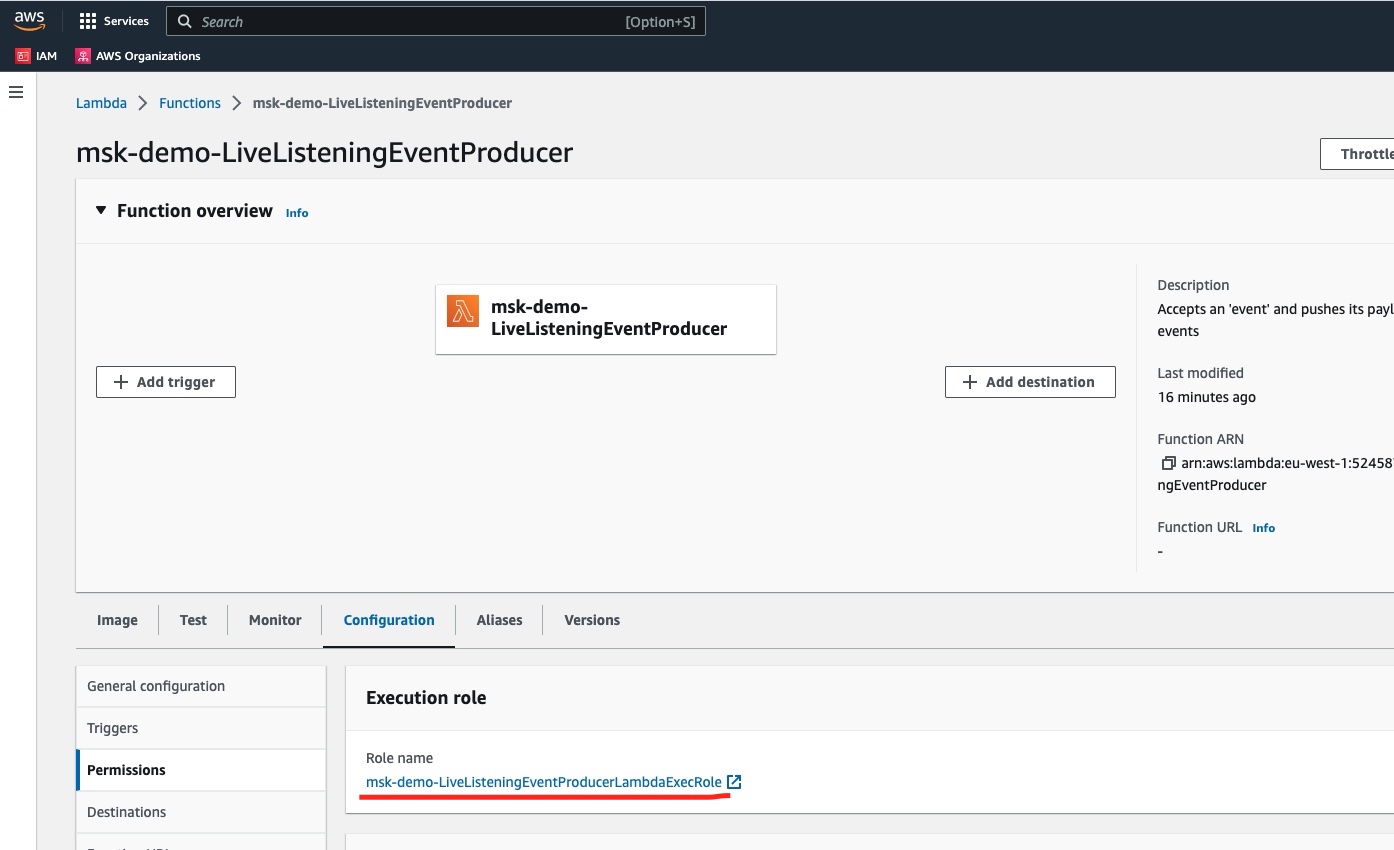
If we click to see the details of the function, and then visit the Configuration tab and the Permissions sub-tab, we will see the Execution Role attached to this function:
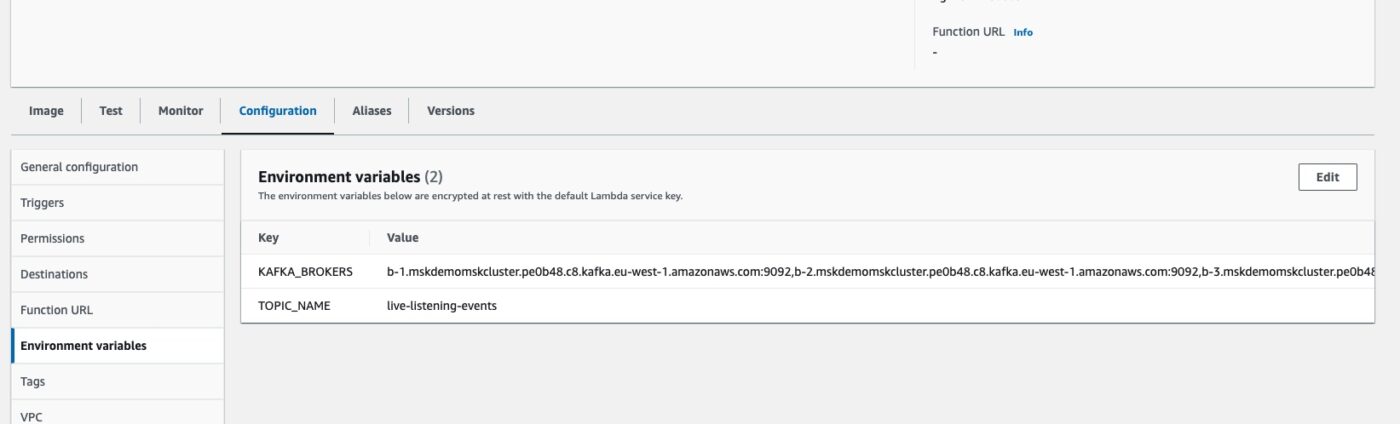
Also, if we click on the Environment variables sub-tab, we will see the environment variables KAFKA_BROKERS and TOPIC_NAME having been set automatically.
Test Kafka Producer Lambda Function
With everything in place, we can use the AWS Lambda Function dashboard to manually test that our function produces Kafka events that can be consumed by Kafka consumers.
Kafka Console Consumer
But first, let’s start the Kafka console consumer inside the EC2 client machine.
SSH to EC2 Client Machine
We get the connection details on how to connect to the EC2 client machine and we fire the correct ssh command:
$ ssh -i ~/.ssh/me-ireland.pem ec2-user@ec2-54-246-5-70.eu-west-1.compute.amazonaws.comChange Working Directory to Kafka Installation Folder
$ cd kafka_2.13-3.2.0Start Kafka Console Consumer
We are ready to start the Kafka Console Consumer:
$ ./bin/kafka-console-consumer.sh --bootstrap-server ${KAFKA_BROKERS} --consumer.config ./bin/client.properties --topic ${TOPIC_NAME} --from-beginningThe above command will start the Kafka console consumer and will wait for events to be published. For every event that is published it will print a line with the details of the event.
Invoke the Kafka Producer Lambda Function
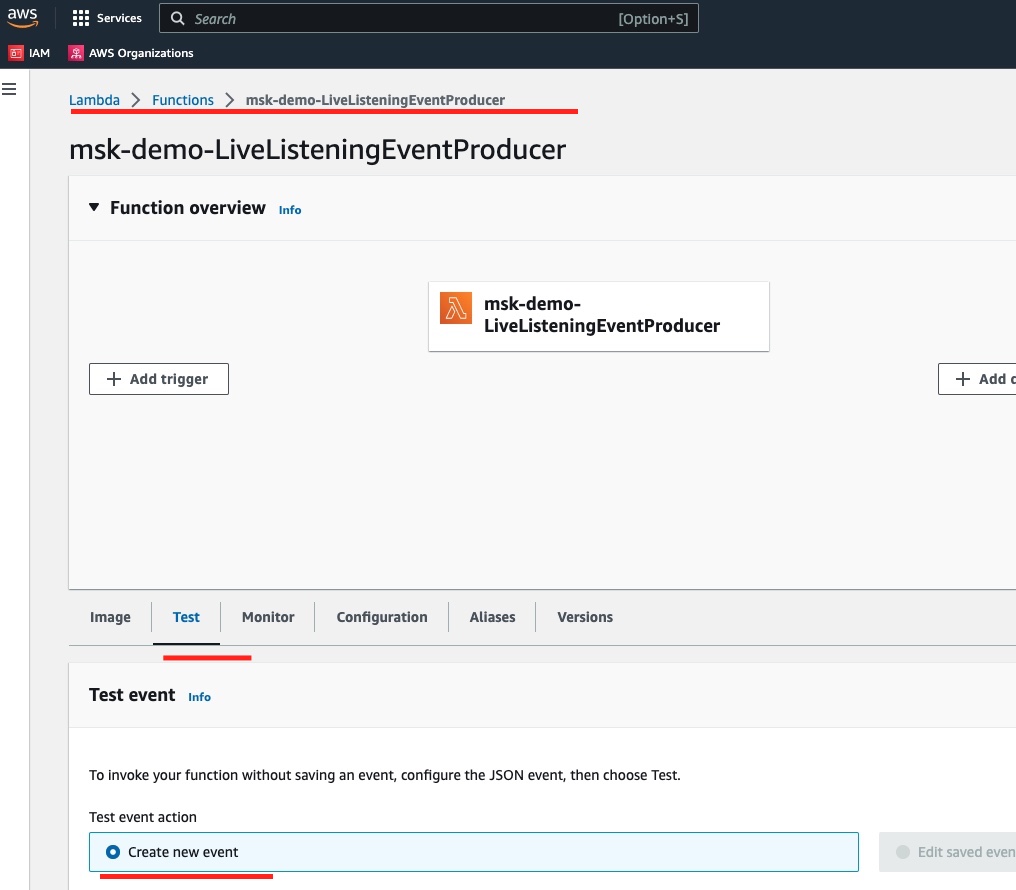
While consumer is waiting for events to arrive, let’s publish one event using the Lambda function dashboard test functionality.
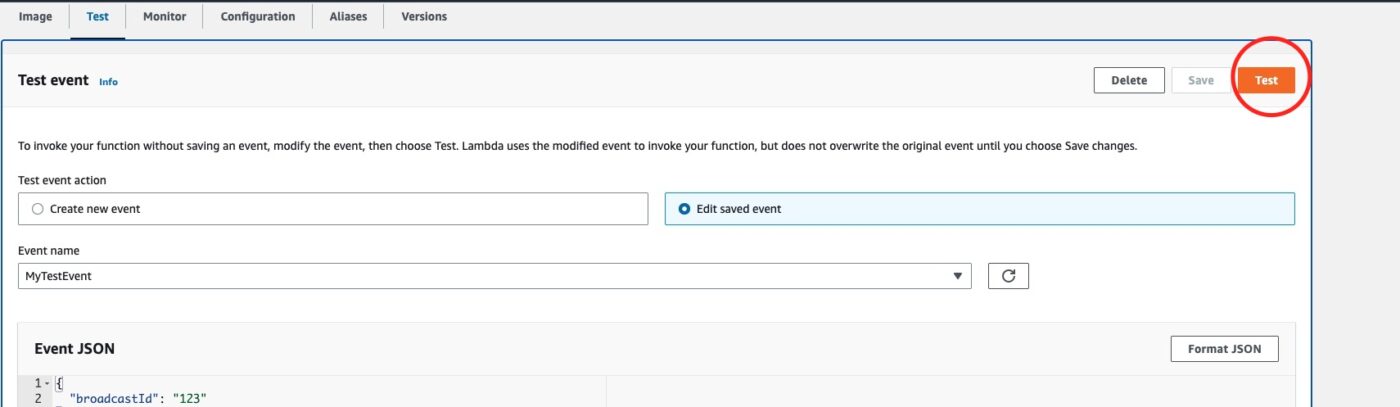
We go to the test page here:
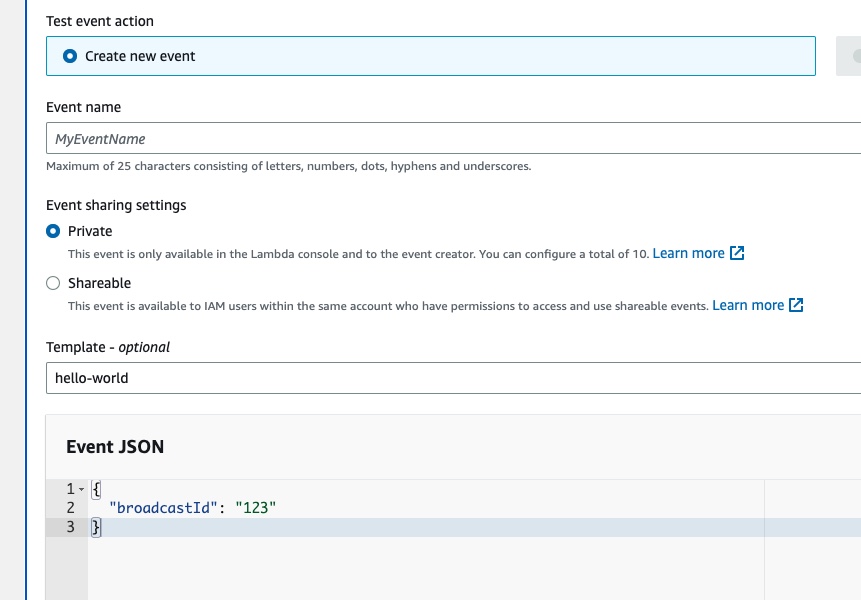
Then we edit the content of the new test event that we want to create so that it has the following value:
{
  "broadcastId": "123"
}
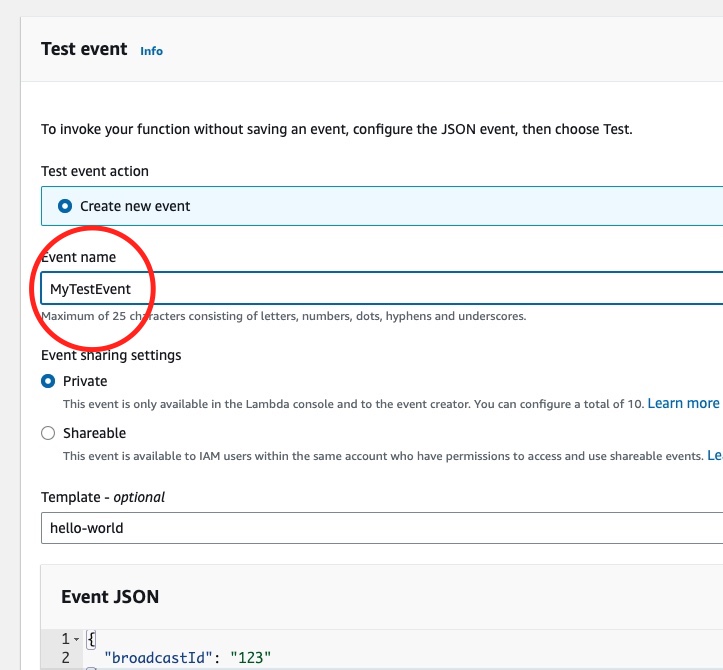
We don’t forget to give a name to our test event:
Then we click Save button on the top right corner of the Test Event definition:
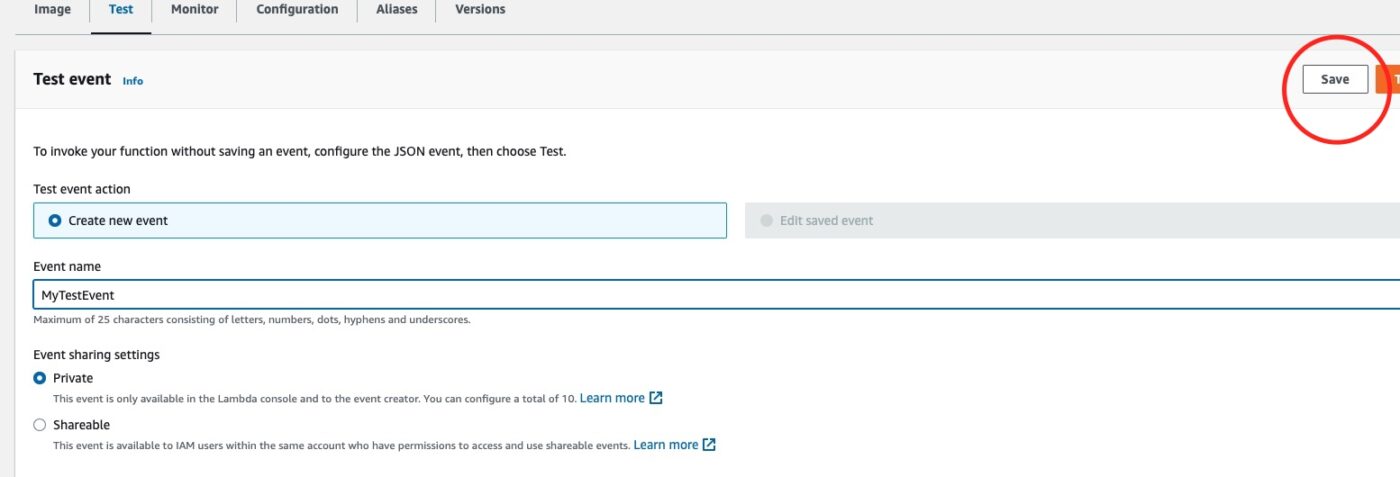
With the test event saved, we then hit the button Test to fire a single test invocation of our lambda function.
After the successful test invocation, we see the Kafka console consumer consuming the event that our producer has produced:

Excellent!
Destroy To Avoid Further AWS Costs
To avoid being charged more than you want, make sure that you call Terraform to destroy all the 16 resources that we have created for this part of the tutorial:
$ terraform destroyClosing Note
That is the end of Part 4 of the tutorial series Practical Terraform & AWS. We will continue with the fifth Part Exposing an API Gateway Endpoint To Accept Incoming Events.
Contact Me
If you want to contact me to ask questions and provide feedback and comments, you are more than welcome to do it. My name is Panos and my email is panos@mixlr.com.