Consuming Events using AWS ECS

Part 1 – Objectives, Audience, Tools & Prerequisites
Part 3 – Using JavaScript Client To Produce and Consume Events
Part 4 – AWS Lambda Function To Produce Kafka Events
Part 5 – AWS API Gateway For Accepting Events
Part 6 – Consuming Events Using MSK Connect – S3 Bucket Sink
Part 7 – Consuming Events Using AWS ECS
Part 8 – Storing Consumed Events Into AWS RDS
Introduction
In the previous part 6, we created a consumer that relied on AWS MSK Connect service. In the current part, we proceed to implement a JavaScript consumer that is deployed into AWS ECS using Fargate launch type.
We will learn how we create
- ECS Task Definitions
- ECS Clusters and
- ECS Services
Important: If you follow along the steps suggested in this tutorial, you will probably be charged for the resources created in AWS. Make sure that, at the end of the learning experience, you run the necessary actions to destroy these resources, so that you are not charged for any reason. The command that we use, at the end of the process, to destroy the resources we create with this demo, is:
terraform destroyLet’s start
Architectural Objective
We build up on what we have already designed in the previous parts. Here is our architectural objective and what is the new part we are going to add with the current tutorial.
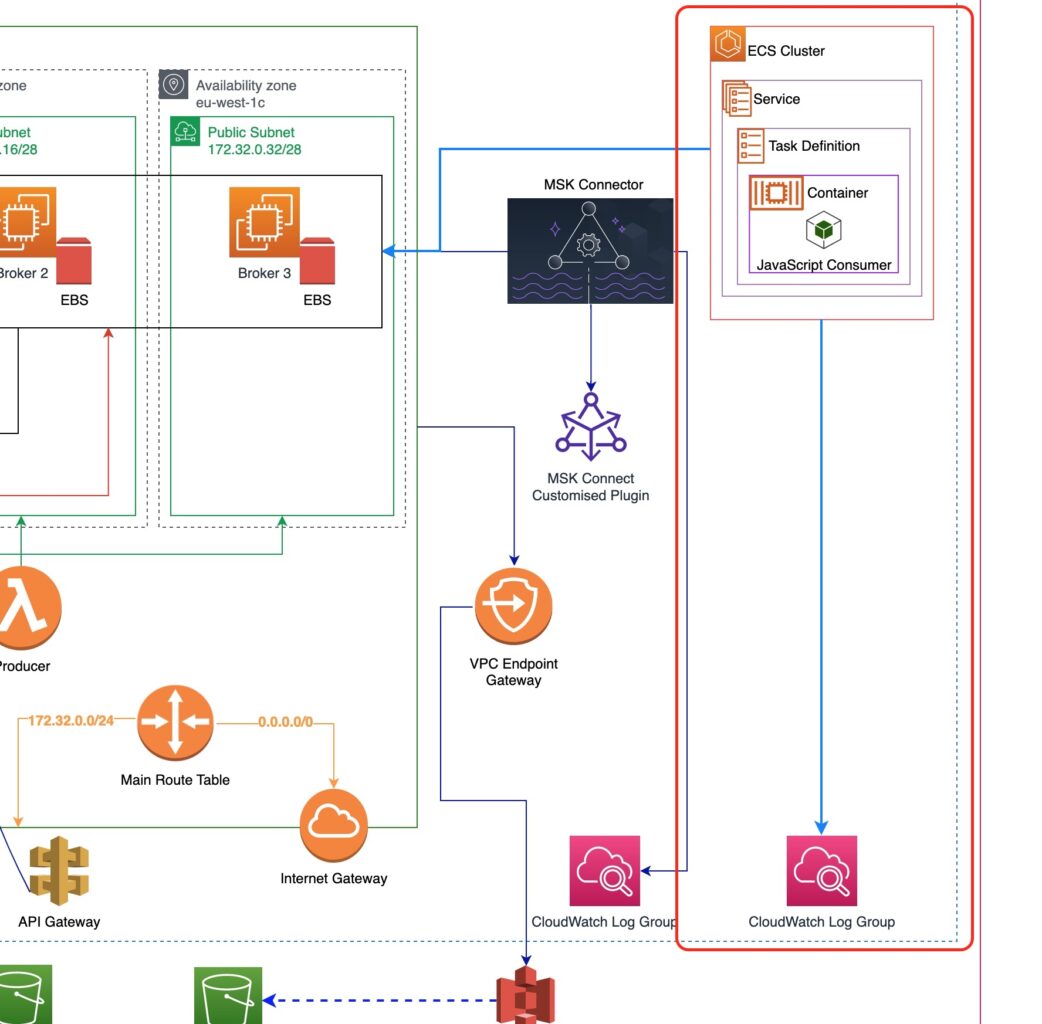
As you can see from the picture above:
- We will create an AWS ECS Cluster. Inside that cluster,
- we will create an AWS ECS Service that
- will rely on an an AWS ECS Task Definition, which
- will be using an AWS ECS Container, which will be using
- a JavaScript code binary package that will consume the events.
The JavaScript code binary package will be living inside an AWS ECR repository (which is not depicted in the picture above).
We will also make sure that the AWS ECS Cluster has access to the VPC our MSK cluster will be in, so that it will be able to connect to the Kafka Brokers to consume events.
Event Consumer JavaScript Code
Let’s start with the JavaScript code that will be consuming the Kafka events. In Part 3 of this tutorial series, we have seen an example of JavaScript code that consumes events. We will take that code and we will wrap it into a Docker image.
Consumer Docker Image Folder
First, we create a new folder inside our working directory. We name this folder live_listening_event_consumer and our intention is to put inside the JavaScript code for the event consumer and turn it into a Docker image.
$ mkdir live_listening_event_consumerChange Directory To New Folder
We
$ cd live_listening_event_consumerNodejs Project
We then use yarn to initialize a new Nodejs project:
$ yarn initWe accept the default suggested answers but for the entry point we answer app.js.
❯ yarn init
yarn init v1.22.19
question name (live_listening_event_consumer):
question version (1.0.0):
question description:
question entry point (index.js): app.js
question repository url:
question author (Panagiotis Matsinopoulos):
question license (MIT):
question private:
success Saved package.json
✨  Done in 7.58s.
This will generate a package.json file with the following content:
{
  "name": "live_listening_event_consumer",
  "version": "1.0.0",
  "main": "app.js",
  "author": "Panagiotis Matsinopoulos",
  "license": "MIT"
}
We then change the project type to be module, which will allow us to use the ECMAScript syntax for importing and exporting stuff from our JavaScript code. This change makes our package.json file being:
{
  "name": "live_listening_event_consumer",
  "version": "1.0.0",
  "main": "app.js",
  "author": "Panagiotis Matsinopoulos",
  "license": "MIT",
  "type": "module"
}
Kafka JS Dependency
For the implementation of our JavaScript Kafka consumer we will need the KafkaJS client library. Here is how we add this dependency to our project:
$ yarn add kafkajsStart Script
Finally, we add a new package script to declare how we will invoke our JavaScript code to start consuming events.
Here is the final version of our package.json file:
.gitignore File
Since we use git to keep control of our source code, we make sure we have a .gitignore file with the following contents:
node_modulesThis makes sure that the node_modules folder that is created by yarn is not included in our git repository.
The JavaScript Consumer File
Then we create the app.js JavaScript Consumer file, the content of which should be familiar to you from part 3.
The most important difference to the JavaScript consumer code we saw in part 3 is that now we use environment variables to get the Kafka Brokers URL and the topic name. Hence, we don’t have to hard code it in the client code and it will be easier to change without the need for redeploy.
Other than that, the consumer will be logging the partition, the offset and the value of the incoming Kafka event. In the next part of the tutorial series, we will see how the consumer will be storing this information into a relational database.
The Dockerfile
Since we want to build a Docker image with the consumer code, we have to create a Dockerfile. Here is its content:
We build our image from node:gallium-slim which has everything that we need and it is quite light in size.
We copy the package.json and yarn.lock file into the image default working directory.
Then we execute yarn install --non-interactive to install the necessary packages.
We then copy over the app.js file.
Finally, we define the image entry point to be the yarn consume command, which will call the app.js script to start the event consumer.
Test Docker Image
With the Docker file in place, we need a way to test it before we deploy it to our production AWS account.
In order to test it, we will need Kafka running locally. In Part 3, we did some tests with Kafka after having downloaded Kafka in our local machine folder. But in Part 4, when we developed a Docker image for the producer of events we used Docker Compose to test it locally. We will this latter approach here too.
Docker Compose File
We create the file docker-compose.development.yml with the following content:
The first service declared is the service for our consumer code. It is named live_listening_event_consumer and it is built using the local Dockerfile. The Docker image that is built is called msk-demo/live_listening_event_consumer. Note the environment variables that we pass to the running service. One for the Kafka brokers and one for the topic name.
The other two services, zookeeper and kafka will help us test our image locally.
Bring Services Up
To bring the services up and running we execute:
docker-compose -f docker-compose.development.yml up -dThis command will also build the image for our consumer code.
Create Kafka Topic
With the three services up and running we can now connect to the Kafka container and create the Kafka topic.
$ docker-compose -f docker-compose.development.yml exec kafka kafka-topics --create --topic live-listening-events --bootstrap-server kafka:9092If everything goes well, we see the message:
Created topic live-listening-events.Watch Consumer Logs
Before we publish an event to witness it being consumed by our consumer, we first issue a command to start watching at the consumer logs.
$ docker-compose -f docker-compose.development.yml logs --follow live_listening_event_consumerThis will hold off of our terminal and will start printing the log the consumer logs into the console.
For example, you will see the message Start consuming... being logged. Or a message about the consumer joining a consumer group.
Produce a Kafka Event
We keep this terminal open to see the log messages coming in and then we start a new terminal on local machine inside the folder live_listening_event_consumer.
In the new terminal, we issue a command to start an interactive Kafka Console Producer session:
$ docker-compose -f docker-compose.development.yml exec kafka kafka-console-producer --bootstrap-server kafka:9092 --topic live-listening-eventsThis will give us a prompt for us to type in the messages/events payloads, line-by-line.
>There we write a message and hit <Enter>. Producer accepts the message and publishes it.
> Message 123
>
Switching to the terminal that prints the logs of the consumer, we will see the line:
live_listening_event_consumer-live_listening_event_consumer-1 | { partition: 0, offset: '1', value: 'Message 1234' }This proves that our consumer works as expected. The Docker image is ready to be used in our infrastructure.
We type <Ctrl+C> at the terminal of the producer to stop it. Then we do the same with the terminal that prints the logs of the consumer. These terminals are now free and we can continue using either of them.
Deploy to AWS Account
With the consumer Docker image ready, we need to deploy it to our AWS Account. We will use the AWS ECR service, which allows us to create Docker image repositories.
Terraform File for AWS ECR
In the root folder of our working project (where the main.tf file is) we create the file live_listening_event_consumer_ecr.tf with the following content:
This is quite similar to the file live_listening_event_producer_lambda_ecr.tf file.
Some important notes about it:
- We use the Terraform resource
aws_ecr_repositoryto create the repository to store our Docker image. - lines 4 – 6: We create a dependency to
null_resource, the one for logging in into AWS ECR. This is a locally-executed command that allows us to push to AWS ECR. Note that thenull_resourcesare defined inside the filenull_resources.tf. - We use
local-execprovisioners that executedockercommands to build the image and push it to remote repository. - We also have a couple of
destroyphaselocal-execprovisioners that will be executed only when we issue the commandterraform destroyand they make sure local images are removed.
Terraform File For AWS ECS
This is the main file for this part of the tutorial series. We name it live_listening_event_consumer_ecs.tf and we save it in the same root folder (where we have the main.tf file).
This is the content of this file:
Let’s have a look at it by breaking into logical chunks:
IAM Role to Execute AWS ECS Tasks
The AWS ECS service needs to have the appropriate privileges to execute AWS ECS defined tasks. For that reason, we need to create the correct IAM Role and attach the AWS ECS Tasks part of the service as a trusted entity. This is how we do it:
- We use the Terraform resource
aws_iam_roleto declare that we want to create an IAM Role. Inside that the most important part is theassume_role_policywhich, basically, declares what we call a Trusted Entity, i.e it declare which entity can assume this role. When we want the role to be assumed by an AWS service we use theServicePrincipal and we set it have the correct value for the AWS Service we are interested in. In our case it isecs-tasks.amazonaws.com. TheActionshould bests:AssumeRole. - Then we grab a reference (using the
datasource) to an AWS-managed IAM Policy that already defines the privileges our role needs to have. This IAM Policy has the ARN that use see in line 25 above. - Finally, we attach the IAM Policy to the IAM Role (lines 28 – 31).
Hence, our IAM Role is ready to be used later on. We will see how in a while.
AWS CloudWatch Log Group
The next block will create a new AWS CloudWatch Log Group. We will use it later on to tell AWS ECS in which log group our task will be logging stuff.
Task Definition
This is the first of the three most important parts of the file live_listening_event_consumer_ecs.tf.
- We use the Terraform resource
aws_ecs_task_definitionto declare that we want to create an AWS ECS Task Definition. The task definition is the definition of a task that can be instantiated using a AWS ECS Service. - The
familyis more like a name. But every definition is uniquely identified by the family name and its version. The version is an integer which is automatically attached to the family name every time we create a new version of the task definition for that family. For example, every time we publish a new image for a task we create a new version. Hence, the full identifier of a task definition is a string that has the pattern<family>:<version>. For example:live-listening-event-consumer:1is for the 1st version. - On line 3 above, we declare that our task definition is compatible with the
FARGATElaunch type. The Fargate is a fully managed launch type offered by AWS. With Fargate we don’t have to manage the infrastructure. AWS does it for us. - The line 4 above defines the network mode as
awsvpc. This is very important because we tell that our task can attach to an AWS VPC. When we later on create an AWS ECS Service to run this task definition we will precisely tell that our task has access to the same AWS VPC like our AWS MSK Cluster. - Then we define the capacity of the machine that this task will require to run. The
cpuattribute takes the value256which means it will require 0.25 vCPU power. Thememoryattribute takes the value512which means it will require512MBof RAM. You can read more about the task definition parameters here. - With the
execution_role_arnwe tell which IAM Role our task will use when running as an AWS ECS Service. We set it to be the IAM Role we declared earlier in thelive_listening_event_consumer_ecs.tffile. - The
container_definitions(lines 8 – 33) is about the configuration of the containers that the AWS ECS Service will later use when running this task definition. The most important parts of it are:- The
imageattribute which points to the AWS ECR Repository we declare earlier. - The
environmentwith all the environment variables the container will need. Look how we pass theKAFKA_BROKERSand theTOPIC_NAME. - The configuration for logging. This is how we link to the newly created AWS CloudWatch Log Group.
- The
ECS Cluster
The second most important part is the AWS ECS Cluster definition.
This is very simple, as you can tell from the above code snippet. Besides the name, we also enable the Container Insights so that we can have metrics at the running task, service and cluster levels. These metrics will be built up by the information that will be logged into a special CloudWatch Log Group. We will see that later.
ECS Service
The third, and last, most important part is the AWS ECS Service definition:
- The service has a
name. - Then, line 3 above, we link it to the cluster.
- We link it to the task definition (line 4).
- We set the launch type to be
FARGATE, compatible to our task definition launch type (line 5). - We set the scheduling strategy to be
REPLICA. This strategy places and maintains the desired number of task instances across the cluster. By default, it will run the task across Availability Zones. Since we will link to our VPC that spans 3 availability zones the tasks will be instantiated accordingly. You can find more information about the scheduler here. - Lines 8 – 12 define the network configuration. This is how we link the service to the VPC of our AWS MSK Cluster. Also, we set the security group to be the main security group of the VPC which freely allows traffic amongst the entities of the VPC having the same security group. It is very important to also assign a public IP (line 11). This will allow the service to fetch the image from the AWS ECR Repository.
- Lines 14 to 20 have to do with the deployment strategy.
- We set the desired number of task instances to be 1.
- We set the minimum number of healthy running instances on deployment to be 1 (100% of the desired count). Hence, when the deployment will be taking place, the service will make sure that at least 1 instance is running while deploying the new one.
- We set the maximum number of running instances on deployment to be 2 (200% of the desired count). Hence, when the deployment will be taking place, the service will max to 2 running instances running at the same time. One with the old task definition and the second with the new task definition. Then it will bring done the task with the old task definition. This will make sure that we have high availability while the deployment is taking place.
- Finally, we make sure that we rollback to a previous version of the task if the new version cannot be deployed.
- On line 27, we enable the ECS managed tags. Hence, besides the tags that are created with the
tagsattribute (lines 33 – 37), some extra tags will be attached to the created service, like, for example, a tag indicating the cluster the service is running for. - The
propagate_tagsfromTASK_DEFINITIONwill make sure that whatever tags we have defined at the task definition level will also appear as tags at the service level. - The
wait_for_steady_statewill make sure that theterraform applywill wait for the service to be on the steady state before considering the resource successfully created.
Terraform Apply
We have all the files in place:
- From Part 2
client_machine.tflocals.tfmain.tfterraform.tfvarsvariables.tf
- From Part 4
live_listening_event_producer_lambda_ecr.tflive_listening_event_producer_lambda_func.tfnull_resources.tfglobal_data.tf
- From Part 5
aws_api_gateway.tf
- From Part 6
msk_connect.tf
- From Part 7 (current one)
live_listening_event_consumer_ecr.tflive_listening_event_consumer_ecs.tf
Let’s apply the configuration with the following command.
Important: Docker daemon should be running locally. Also, this will create resources in your AWS account that will incur costs. Make sure that you execute the terraform destroy command at the end of your practice to avoid further charges.
$ terraform applyThis is presenting us with a plan to create 47 resources. Type yes and let Terraform create them. It will take a lot of time (30 – 90 minutes), especially because of the MSK cluster.
At the end of the successful application the message
Apply complete! Resources: 47 added, 0 changed, 0 destroyed.will appear at the terminal.
Double-Check Application Results
We can open the AWS Management Console and double-check that Terraform has applied the configuration as we expected.
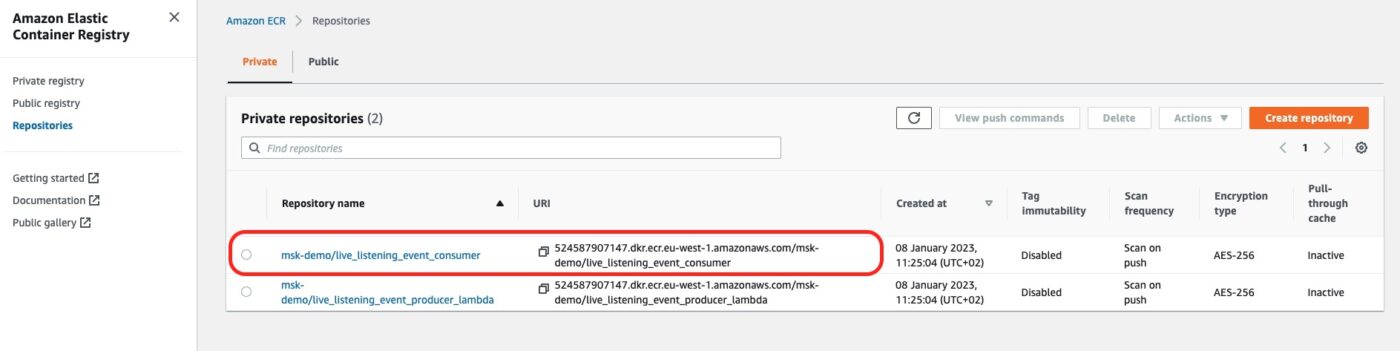
The AWS ECR Repository
We can go to the AWS ECS service. This is where we will see the new AWS ECR Repository for our consumer Docker image:
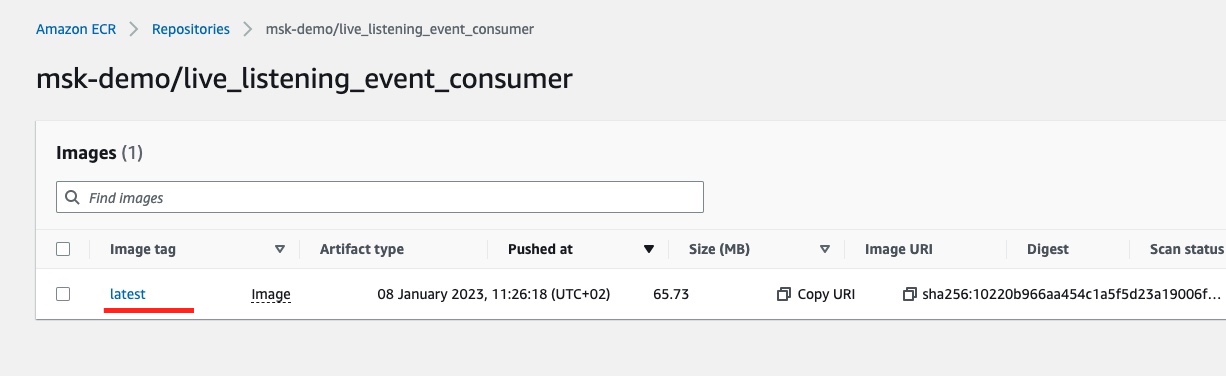
If we click on the repository link we will see the details of the latest tagged image:
The Task Execution Role
If we go to the IAM Role console, we can see the IAM role created with the AmazonECSTaskExecutionRolePolicy.
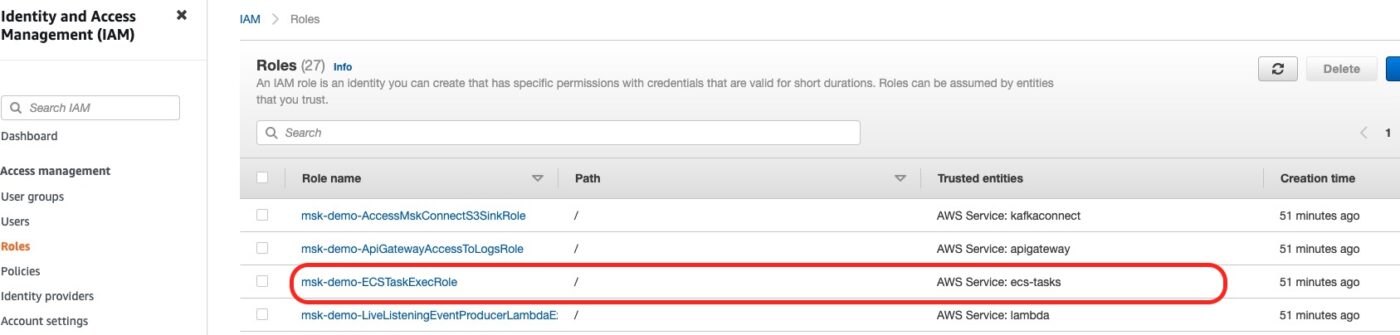
In the above screenshot you can see the Trusted Entity being the AWS Service: ecs-tasks.
Also, if you click to see the details of the role, you will see this:
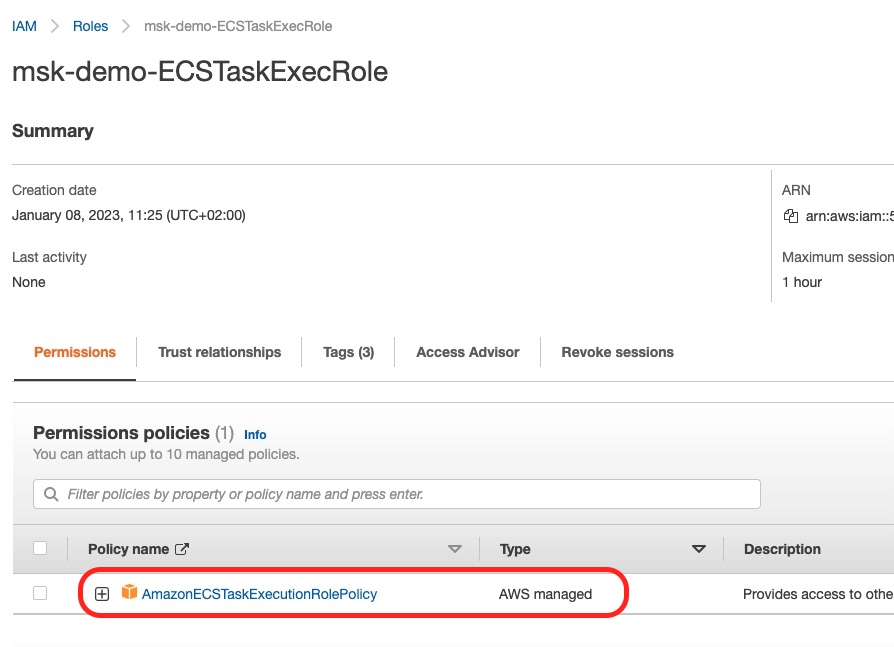
This, above, is the fact that the correct IAM Policy (AmazonECSTaskExecutionRolePolicy) has been attached to the role. See how this policy is not something we created, but it is AWS managed.
CloudWatch Log Groups
Then we can go to the CloudWatch Log Groups:
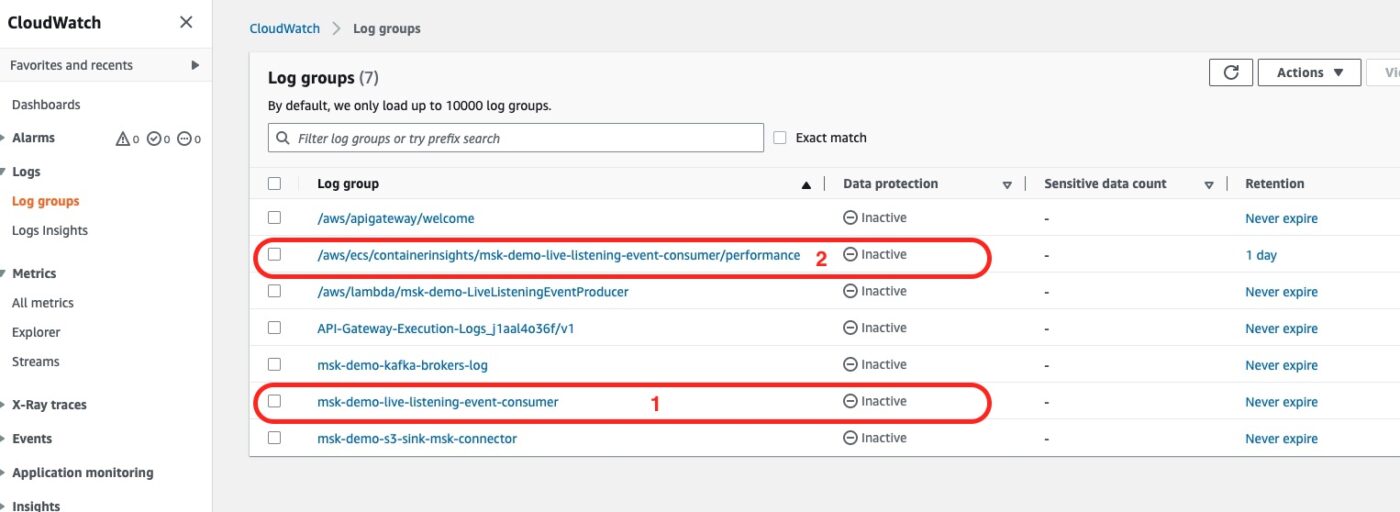
The Log Group number 1 is the one that we have explicitly defined in our Terraform files. It will be holding all the logs that the Service will be logging as part of the execution of the Task. For example, any console.log commands that we have in our consumer code will go there.
The Log Group number 2 is one Log Group that is automatically created because we have enabled the Container Insights in our Terraform configuration for the ECS Cluster. This will be holding performance-related logs that will be used to build performance-related metrics.
ECS Task Definition
We then go to the ECS Service and in their Task Definitions list:
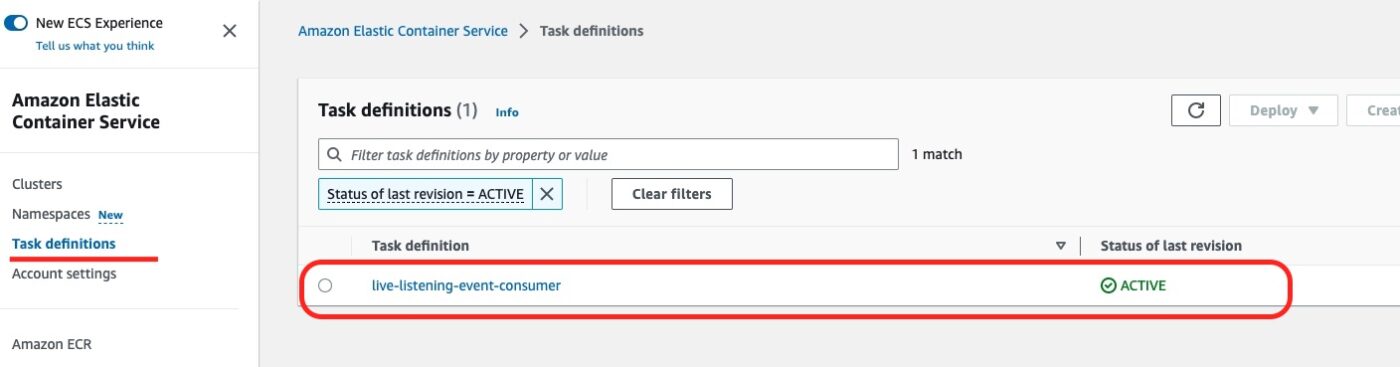
We can see the live-listening-consumer task definition being active.
If we click on the task definition link, we see the list of the task definition revisions. It should have only one ACTIVE.
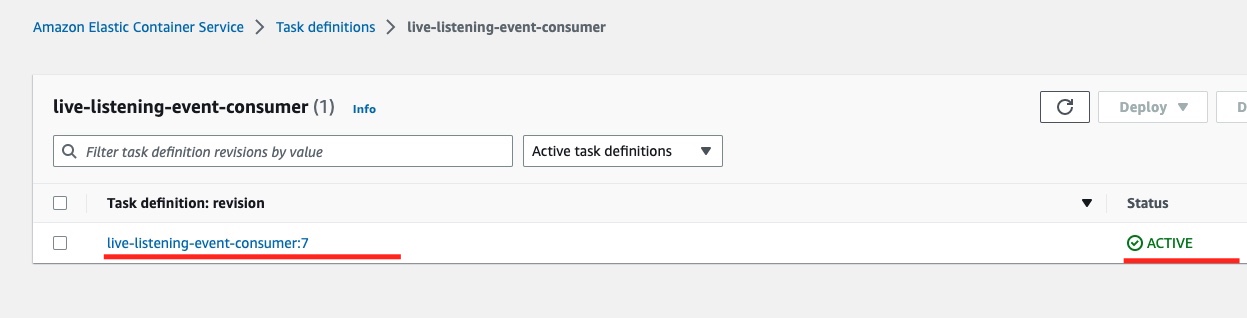
If we click the revision link, we can see the task definition revision details:
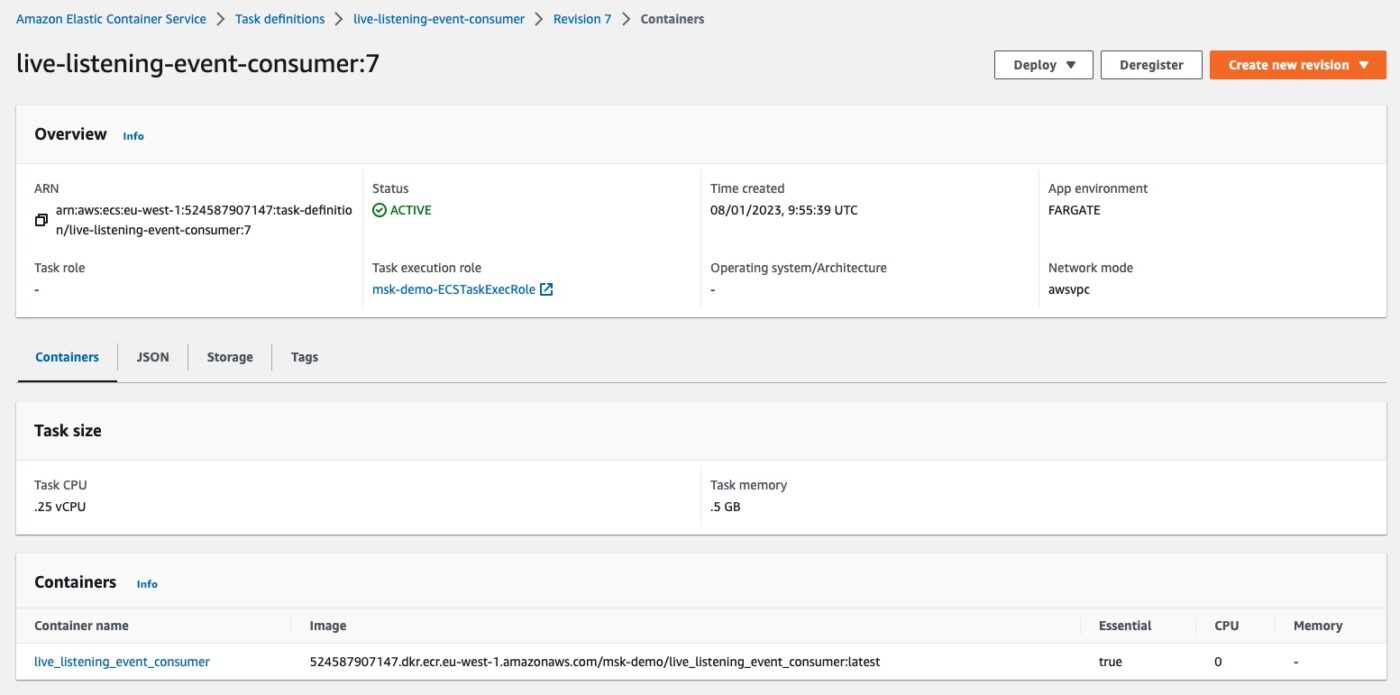
We can identify the CPU and memory limit and the link to the container Docker image that this task definition will use when instantiated.
We can also identify the Network mode being awsvpc and the App environment being FARGATE.
ECS Cluster and ECS Service
Then, on the left-hand side of the ESC Dashboard menu, we can select to see the list of ECS Clusters.
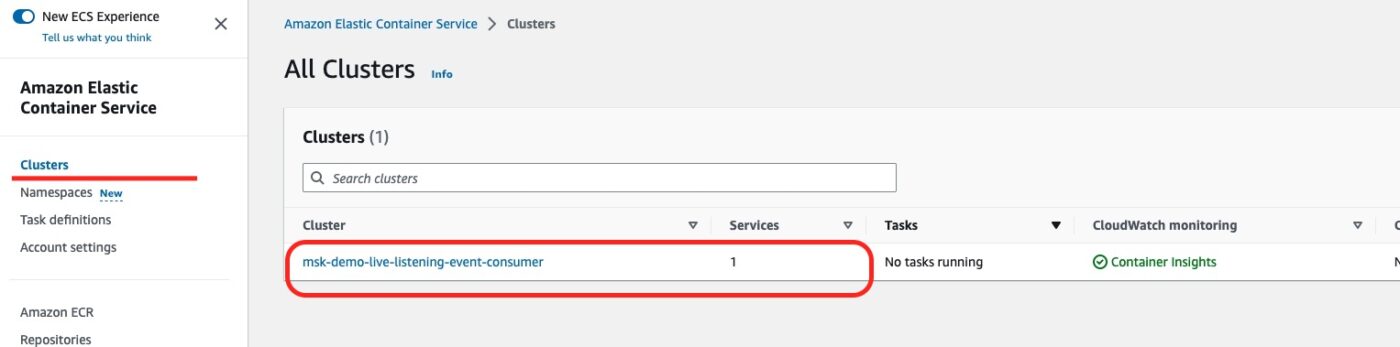
We can see our newly created ECS Cluster. Also, we can see that it is being used by 1 Service.
If we click on the cluster link, we will see the following details:
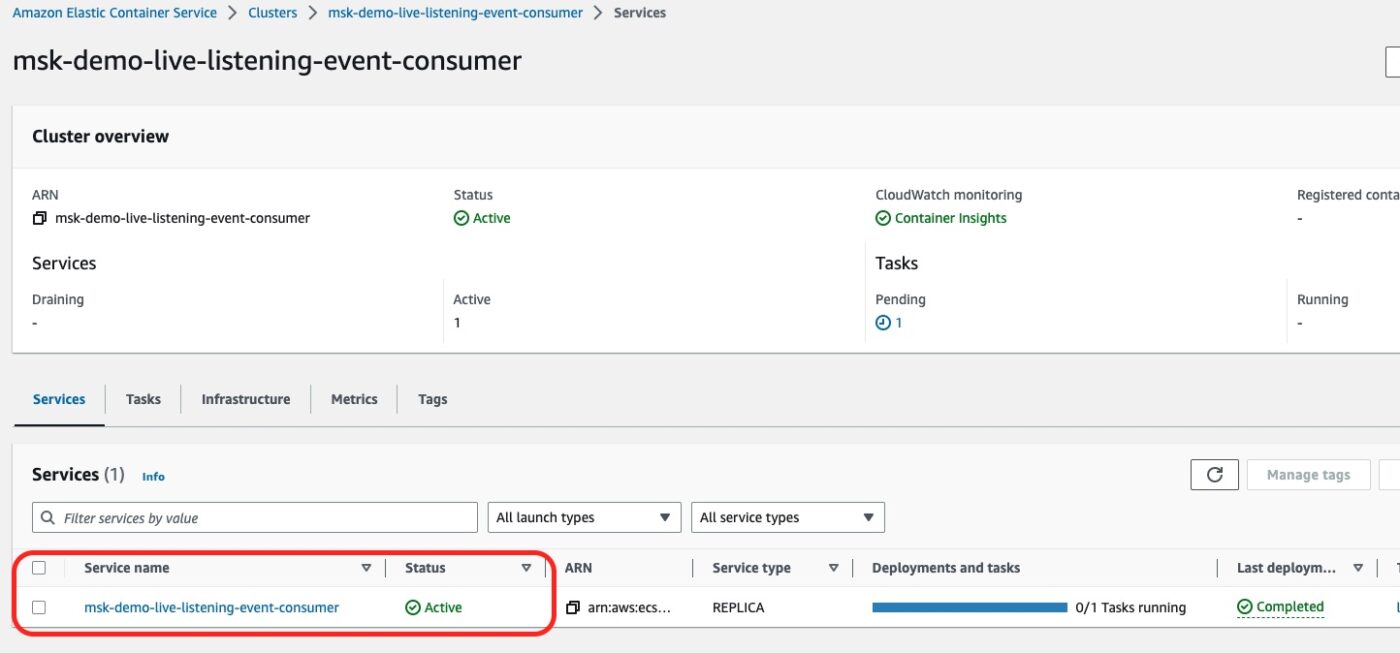
There is 1 Service running on this cluster. It is our service for the event consumer.
Test Implementation
Having done a first visual inspection of the results, we now proceed in doing a real test.
We Send An Event
We are now ready to use the curl command from our local machine to send an event over the API Gateway.
From the API Gateway console we get the endpoint we have to call:
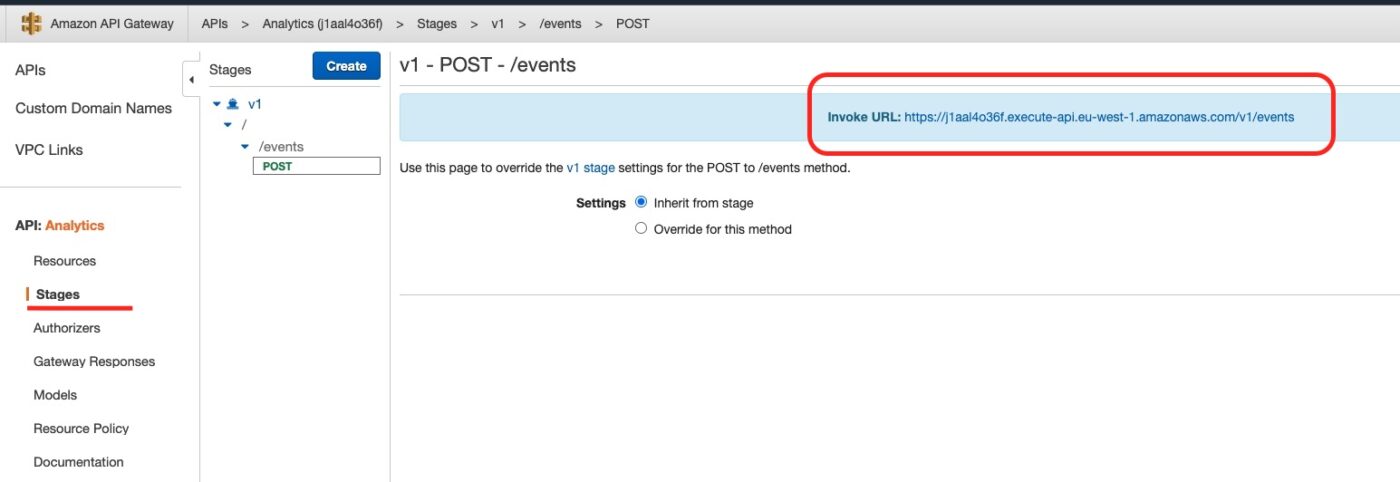
Then we call the curl command from our local machine as follows:
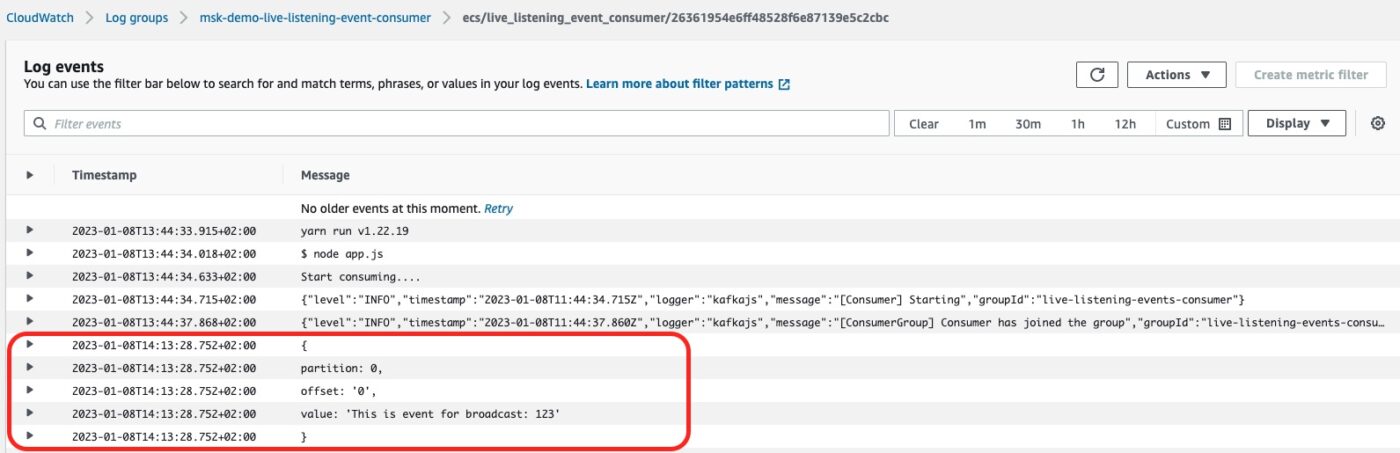
$ curl -v -X POST 'https://j1aal4o36f.execute-api.eu-west-1.amazonaws.com/v1/events' -H 'Accept: application/json' -H 'Content-type: application/json' -d '{"broadcastId": "123"}'We Check Consumer Logs
The final step is to check the consumer logs. We go to CloudWatch Log Group and we visit the details of the Log Group msk-demo-live-listening-event-consumer.
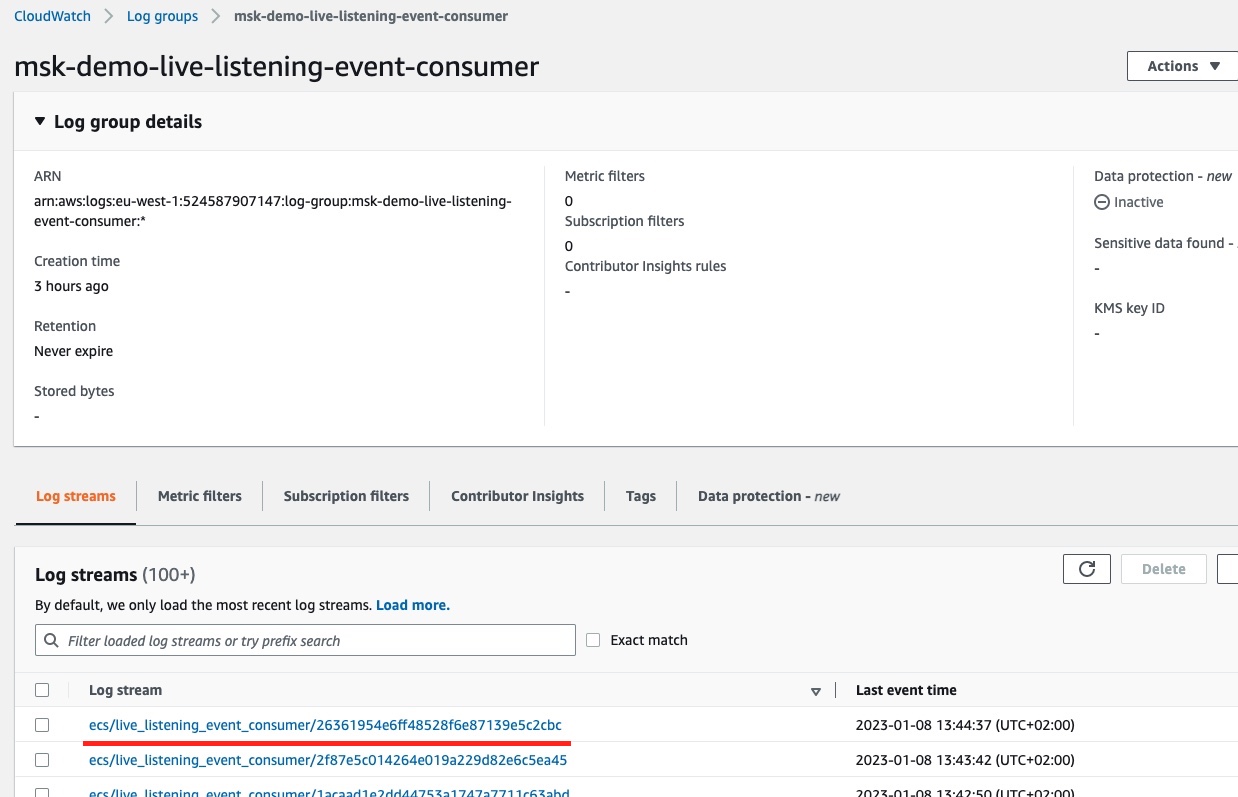
We click to open the latest stream. And we see the consumer logging the details of the event processed:
If we issue one more curl command:
curl -v -X POST 'https://j1aal4o36f.execute-api.eu-west-1.amazonaws.com/v1/events' -H 'Accept: application/json' -H 'Content-type: application/json' -d '{"broadcastId": "456"}'The consumer logs will be updated accordingly:
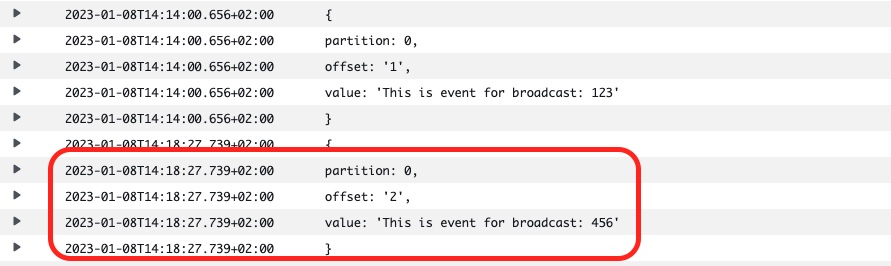
Which proves that everything works as expected!
Destroy To Avoid Further AWS Costs
To avoid being charged more than you want, make sure that you call Terraform to destroy all the 47 resources that we have created:
$ terraform destroyClosing Note
That is the end of Part 7 of the tutorial series Practical Terraform & AWS. We will continue with the eighth and final Part in which we make our consumer store the event inside a database.
Contact Me
If you want to contact me to ask questions and provide feedback and comments, you are more than welcome to do it. My name is Panos and my email is panos@mixlr.com.