Storing Consumed Events into AWS RDS

Part 1 – Objectives, Audience, Tools & Prerequisites
Part 3 – Using JavaScript Client To Produce and Consume Events
Part 4 – AWS Lambda Function To Produce Kafka Events
Part 5 – AWS API Gateway For Accepting Events
Part 6 – Consuming Events Using MSK Connect – S3 Bucket Sink
Part 7 – Consuming Events Using AWS ECS
Part 8 – Storing Consumed Events Into AWS RDS
Introduction
In the previous part 7, we consumed Kafka events with a consumer that has been deployed as an AWC ECS Task with Fargate launch type. But the consumption logic was very limited. It only logged a message with the event payload, a logged message that we could witness inside the CloudWatch logs.
In the current part 8, we extend the consumer to communicate with a database and store the event as a row inside a relational (SQL) database. The database will be an AWS RDS with Postgres engine.
We will learn
- How to use a Docker image for a Postgres DB when working locally
- How to do a integration from the JavaScript code with the database
- How to define an AWS RDS with Postgres engine
Important: If you follow along the steps suggested in this tutorial, you will probably be charged for the resources created in AWS. Make sure that, at the end of the learning experience, you run the necessary actions to destroy these resources, so that you are not charged for any reason. The command that we use, at the end of the process, to destroy the resources we create with this demo, is:
terraform destroyLet’s start
Architectural Objective
We build up on what we have already designed in the previous parts. Here is our architectural objective and what is the new part we are going to add with the current post.
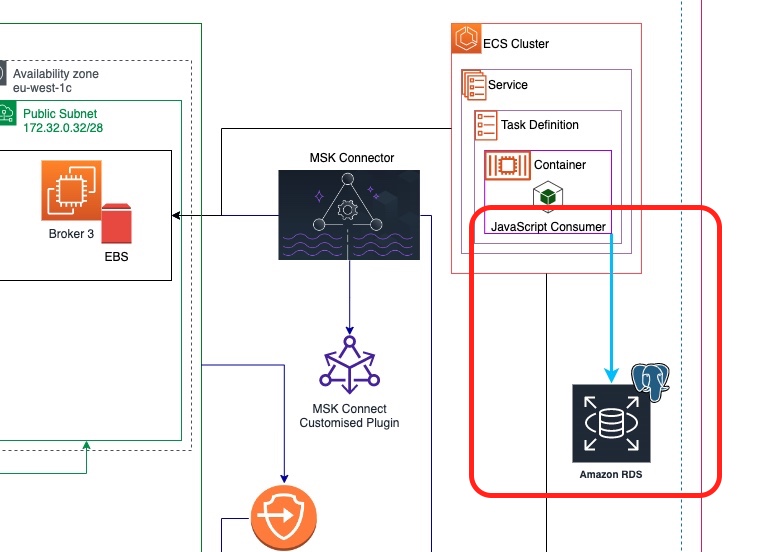
As you can see from the picture above, we are going to create an AWS RDS instance in the our AWS region. This instance will be accessible by our JavaScript consumer deployed into our AWS ECS Service.
Local Development
But first, let’s make it work locally.
Local Database Instance
We need to install Postgres locally. This is quite easy because we are using Docker.
Inside the folder live_listening_event_consumer we already have the file docker-compose.development.yml which sets up our local development environment.
We enhance the file to make it be like the following:
Here are the main points of this file for this part of the tutorial:
- lines 1 – 2: We declare a volume named
db_data. We use it later on in thedbservice specification to make sure that whenever thedbservice starts it uses a named Docker volume, rather than an unnamed one. This is a good practice to keep our Docker volumes tidy. - line 9: We make the
live_listening_event_consumerservice depend on thedbservice. This means that whenever we create alive_listening_event_consumerservice,dbservice will be created too (if not already created). Note that the dependency requires thedbservice to behealthy. - lines 16 – 20: We declare the environment variables and their values, so that the consumer is able to connect to the database. We will see how these environment variables are used inside the JavaScript consumer code later on.
- lines 58 – 70: We are adding a new Docker compose service with name
db.- lines 59 – 61: We build the image locally using the docker file
Dockerfile.development.postgres, which will talk about immediately after. - We specify the password for the
postgresuser to bepostgres. We are in local development, so, we don’t really care to use a strong password. - lines 64 – 68: We declare the
healthcheckproperties that will make sure docker compose knows when our database is ready to accept connections and, hence, consideredhealthy. - lines 69 – 70: We declare a Docker named volume to make sure we persist the data in-between restarts of the container into a volume using an easy-to-deal-with name. We like this as a practice. If we don’t specify the volume, the container creates a local anonymous volume which is difficult to locate and work with.
- lines 59 – 61: We build the image locally using the docker file
Docker File To Build DB Image
Our docker-compose.development.yml file refers to a new locally-located file named Dockerfile.development.postgres. This is the file that is used to build the db service image. Here are its contents:
It is a very simple file that builds an image out of postgres:15.1 image stored in Docker hub. This version of Postgres is currently supported by Amazon RDS and we chose it to build our local Postgres image.
Not only that, we copy over the local file initialize_db.sh. This file, which is explained right after, will be used to initialize the db. It needs to be executable, that’s why on line 4 we use the chmod command to make it user-executable.
Initialize Database Script
Inside the folder live_listening_event_consumer we create the file initialize_db.sh with the following content:
This is a Bash shell script which invokes the psql Postgres cli. It uses it to first, create the database and then create the table that will be used by our consumer to store records in.
This file, is copied over to the created image for our db service.
Build Db Image
Everything is set up for our local development db service. Let’s build its image.
We make sure we are inside the folder live_listening_event_consumer and we execute the following command:
$ docker-compose -f docker-compose.development.yml build dbIf everything goes well, the image should be ready to be used.
Run Local Database Server
With the image built, we can now start our local database server. This is the command to do it:
$ docker-compose -f docker-compose.development.yml up db -dInitilialize Local Database
With the local database server up and running we can now initialize the database and the table inside.
$ docker-compose -f docker-compose.development.yml exec db ./initialize_db.shWe see the messages
CREATE DATABASE
CREATE TABLE
which confirm the successful creation of the database and the table.
We can also execute the following command to confirm the structure of the table created:
$ docker-compose -f docker-compose.development.yml exec db psql -U postgres -d analytics_development -c '\d+ broadcasts;'This will print something like this:
Consumer To Create Record In Database
Our local database has the table which is ready to accept records. Let’s amend our JavaScript consumer code to create a record in the database for each event that it consumes.
Install pg Package
Before we are able to communicate with the database from our JavaScript code, we will need a JavaScript package that offers an API to Postgres. This is the package pg.
We add it to our package dependencies with the following command:
$ yarn add pgAmend JavaScript Consumer Code
Here is the new version of our JavaScript consumer, the file app.js inside the folder live_listening_event_consumer.
- line 2: We import that
pgpackage. - line 4: We get access to the
Poolobject. - lines 6 – 10: We initialize some local variables with access details to the database. We will pass thee details as values of environment variables. When in local development, these environment variables are specified in the
docker-compose-development.ymlfile. When in production, these are going to be part of the ECS Task Definition, which we will detail about later. - lines 12 – 20: We initialize the connection pool. The
pgpackage offers the ability to create a pool of connections that can be reused across threads. - lines 22 – 30: We define the function
insertRecordIntoDb(). This is anasyncfunction and takes as input argument thebroadcastId. The code is very easy to understand.- lines 23 – 27: We build an SQL statement. This is a standard
INSERT INTOstatement that will insert data into the tablebroadcasts. Note that we don’t interpolate the valuebroadcastIdinside the string that we build (thesqlStatement), but we define a placeholder$1that will accept the value from the arrayvalues. - line 29: We execute the query (this is an
asynccall) by passing the string of the SQL statement and the values that will be used by thepoolexecutor.
- lines 23 – 27: We build an SQL statement. This is a standard
- line 56: We just call the
insertRecordIntoDb()function to create a record with the newbroadcastId.
Build Image
Since we have amended some files that affect the Docker image of the consumer, we have to rebuild it.
$ docker-compose -f docker-compose.development.yml build live_listening_event_consumerRun Consumer Locally
We have our database server running and our consumer with up-to-date code to insert rows into the database. It’s about time to test that everything works locally.
Bring Everything Up
Let’s bring everything up
$ docker-compose -f docker-compose.development.yml up -dCreate Kafka Topic
Let’s create the Kafka topic
docker-compose -f docker-compose.development.yml exec kafka kafka-topics --create --topic live-listening-events --if-not-exists --bootstrap-server localhost:9092We see the message
Created topic live-listening-events.Which proves that the topic has been successfully created.
Start Console Producer
We need a way to publish events so that we can see them being consumed by our JavaScript consumer. One way we can do that is by starting the Kafka Console Producer.
Here is the command
$ docker-compose -f docker-compose.development.yml exec kafka kafka-console-producer --topic live-listening-events --bootstrap-server localhost:9092This gives us a prompt > at which we can type in messages that will be published to our Kafka cluster.
But, before we do, let’s go to the JavaScript consumer side.
Watch JavaScript Consumer Logs
Let’s keep an eye at the JavaScript consumer logs. We start a new terminal, because the current one is being occupied by the console producer, and we cd to the live_listening_events_consumer folder. Then we issue the following command to start watching at the consumer logs:
$ docker-compose -f docker-compose.development.yml logs --follow live_listening_event_co
nsumer
This will hold off of our terminal with printing the logs from our consumer.
Publish a Message
We go back to the producer terminal and we publish the following message:
>1
>
Witness Success Message in Consumer Logs
We then look at the consumer logs and we see something like this:
live_listening_event_consumer-live_listening_event_consumer-1  | { partition: 0, offset: '0', value: '1' }
live_listening_event_consumer-live_listening_event_consumer-1  | broadcast record created with id: 1
That is the first indication of success. We can see the two output lines corresponding to the two console.debug() statements in our app.js code.
Confirm Row Created in the Database Table
Finally, we can confirm that the row has been created in the database table with the following command. Note that we need a new terminal window inside the live_listening_event_consumer_folder to be able to execute this:
$ docker-compose -f docker-compose.development.yml exec db psql -U postgres -d analytics_development -c 'select * from broadcasts'This will print:
 id | broadcast_id |          created_at
----+--------------+-------------------------------
  1 | 1            | 2023-01-22 06:46:52.541197+00
(1 row)
which confirms that the consumer has successfully created the row into the database.
Produce More
We produce more messages at the producer console and we execute the command with the select * from broadcasts statement to confirm that the messages are consumed and rows are created in the database.
Everything works locally as expected! Well Done!
Deploy to AWS Account
We have tested everything locally and it works. Now it is about time to start thinking about how to deploy this to our AWS Account
Terraform Files
As we saw in the Architecture Objective diagram, the new block is the AWS RDS instance. In order to provision it using Terraform we will need a new Terraform file, plus some changes to the existing ones:
- New File
analytics_db.tf
- Changed Files:
variables.tflive_listening_event_consumer_ecs.tfclient_machine.tf
We will start with new file first.
AWS RDS with Postgres Engine
The file analytics_db.tf defines the resource to created the AWS RDS with a Postgres engine:
This file actually creates two resources:
- An
aws_db_subnet_groupwith nameanalytics. This resource is necessary when creating the next one, theaws_db_instance, because we need to tell which VPC and subnets will have access to the db instance. As you can see, the definition is quite simple. We just need to specify thesubnet_idsby referring to the VPC subnets we have already defined in themain.tffile. - An
aws_db_instancewith nameanalytics. This the main resource for the database server.
Let’s spend some more time in explaining the db instance part of the file:
- line 13: We build an identifier. This is an optional attribute but it is quite useful to help us distinguish this db instance from others.
- line 14: This is the compute and RAM power of our database serve instance. We chose something small, since our demo is quite primitive and doesn’t require any big power resources.
- lines 16 – 18: We specify the amount and type of storage that we will need. This is absolutely minimum again.
- lines 20 – 21: We specify that we want to use a Postgres engine. We also specify the version.
- lines 22 – 23: We specify the username and password. See how these are going to be set up from the values of the corresponding Terraform variables. These variables are introduced by this part of the tutorial series. We will have a look at them later on.
- line 24: We specify the port we want the database server to listen to. Again, the value is going to be set according to the value of the corresponding Terraform variable.
- line 25: We explicitly say that that this database server will not be publicly available. We will make sure that we are going to have access only from our EC2 client machine, but not from our local development machine nor from any other client machine outside our VPC.
- lines 27-28: We specify that we don’t want AWS to automatically apply major upgrades but we are ok if it applies minor upgrades.
- line 29: We specify a single availability zone, since we are not building a Multi-AZ deployment for our database server.
- lines 31 – 32: We specify the which VPC and subnets will have access to our database server.
- line 34: We tell that we want any automated backups to be removed as soon as we remove/destroy that database server.
- line 36: We remove any deletion protection so that we can use Terraform to destroy the database server.
- line 38: We enable exporting of logs to AWS CloudWatch. We will export any Postgres logs, which are the logs that are created by Postgres server, as well as any logs related to upgrades that AWS will automatically apply.
- line 40: We skip the final snapshot that AWS might create when a database server is destroyed.
- line 42: We disable Enhanced Monitoring settings. If you want you can put a positive value on how often you want them produced.
- lines 44 – 49: We tag our db instance and we make sure that our tags are forwarded to any snapshot that might be created.
New Variables
The resource aws_db_instance requires some variables. We declare them at the end of the variables.tf file. This is how we do it:
variable "db_analytics" {
  type = object({
    username = string
    password = string
    port     = number
    name     = string
  })
  nullable  = false
  sensitive = true
}
And here is the whole file as it is now:
As you can see, the variable db_analytics is of object type and it requires four properties to be set:
- the username to connect to the db instance
- the password to connect to the db instance
- the port to connect to the db instance
- the name of the database to create and work with
Note that we declare this variable as sensitive hence Terraform will not be printing its values while executing the plan.
Note also that we don’t pass the value to this variable via the terraform.tfvars file. We are going to pass the values at the command line, when we will be calling the terraform apply. See later on.
ECS Task
Our ECS Task definition file, live_listening_event_consumer_ecs.tf needs some amendments in order to pass the environment variables our consumer needs.
We need to add the following block of name value pairs inside the environment array inside the aws_ecs_task_definition resource:
{
  name  = "DB_USERNAME"
  value = "${aws_db_instance.analytics.username}"
},
{
  name  = "DB_HOST"
  value = "${aws_db_instance.analytics.address}"
},
{
  name  = "DB_PORT"
  value = "${tostring(aws_db_instance.analytics.port)}"
},
{
  name  = "DB_DATABASE"
  value = "${var.db_analytics.name}"
},
{
  name  = "DB_PASSWORD"
  value = "${var.db_analytics.password}"
}
We use the aws_db_instance output attributes for the DB_USERNAME, the DB_HOST and the DB_PORT. We use the variables for the DB_DATABASE and the DB_PASSWORD.
The full version of our live_listening_event_consumer_ecs.tf file is now:
EC2 Client Machine
The last file that we had to amend was the client_machine.tf with the resource aws_instance.client.
First, we took the connection block from the remote-exec provisioner level and we moved it to the resource level. This allows us to use the same connection settings for other blocks that require it too.
Then we create a new block, a provisioner of type file:
provisioner "file" {
  source      = "live_listening_event_consumer/initialize_db.sh"
  destination = "/home/ec2-user/initialize_db.sh"
}
This is going to copy the file defined in the source to the destination. This is how we are going to have the initialize_db.sh file inside our EC2 instance as soon as the EC2 instance is ready. Having that file inside this client machine will allow us to initialize our database and table in our newly created AWS RDS instance. This happens with the amendment we do in the remote-exec provisioner.
In the remote-exec provisioner, which is going to be executed as soon as the EC2 client machine is ready, we add the following 5 commands:
"sudo amazon-linux-extras enable postgresql14",
"sudo yum clean metadata",
"sudo yum -y install postgresql",
"chmod u+x /home/ec2-user/initialize_db.sh",
"DB_HOST=${aws_db_instance.analytics.address} DB_PORT=${aws_db_instance.analytics.port} DB_USERNAME=${aws_db_instance.analytics.username} DB_DATABASE=${var.db_analytics.name} PGPASSWORD=${var.db_analytics.password} /home/ec2-user/initialize_db.sh"- The first command will make sure that we will be able to install the Postgres version 14 client tools.
- The next two commands, they actually do the installation.
- The fourth command makes sure that the
initialize_db.shfile has execution rights for the userec2-user, which is the user this remote execution takes place with. - The final command is invoking the
initialize_db.shscript passing the necessary environment variables and their values so that the script knows how to connect to the new created database instance and create the database and the table.
The full version of the client_machine.tf file is now this:
Terraform Apply
With all the files in place, we are ready to apply the Terraform configuration that we have prepared.
The command to do this is the following:
$ terraform apply -var 'db_analytics={username: "postgres", password: "12345678", port: "5432", name: "analytics_development"}'Note how we pass values for the variable that does not have its value set inside the terraform.tfvars file. We use the -var option.
We type yes to let Terraform know that we want the plan to be applied and we sit back until everything finishes successfully.
At the end we will see the message:
Apply complete! Resources: 49 added, 0 changed, 0 destroyed.Double Check Application Results
Before we test the implementation, we can first do a quick visual check that the resource of the database server has been successfully created.
We go to the AWS Management console and in particular to the RDS service dashboard. We should see one instance running:
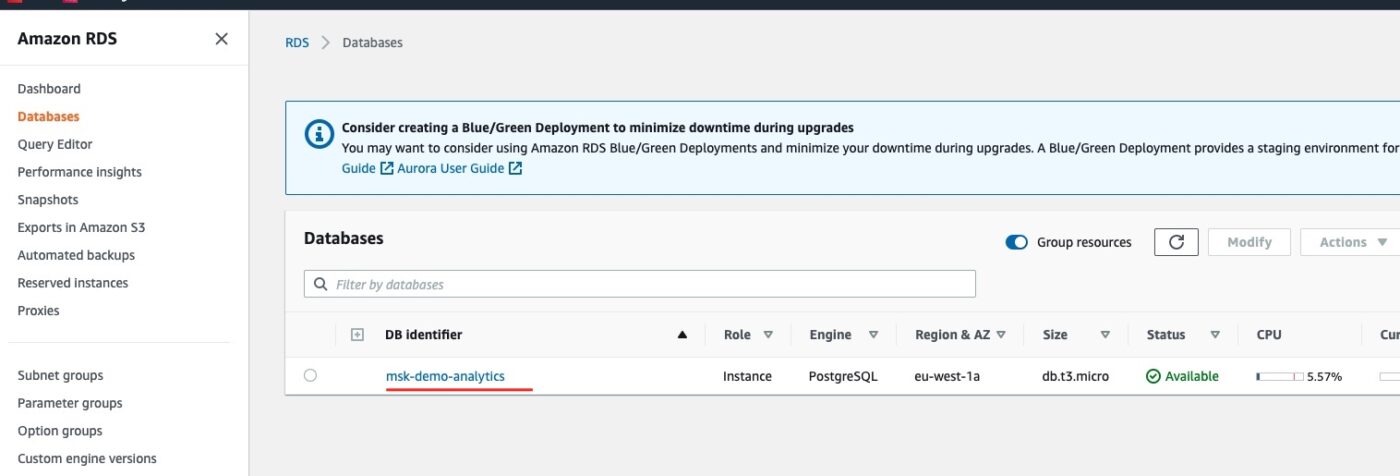
If we click on the link msk-demo-analytics, we will go into the details:

There we can confirm details such as the Class, Region and A and the Port. One very important piece of information is the Endpoint. We will need it later to connect to the database server and confirm the number of rows inside the database table broadcasts.
Test Implementation
After the visual inspection of the results, we can now proceed in testing the actual implementation. The test will involve us sending an event over the REST endpoint and confirming the row created inside the database table broadcasts in our new AWS RDS instance.
We Send An Event
We are now ready to use the curl command from our local machine to send an event over the API Gateway.
From the API Gateway console we get the endpoint we have to call:
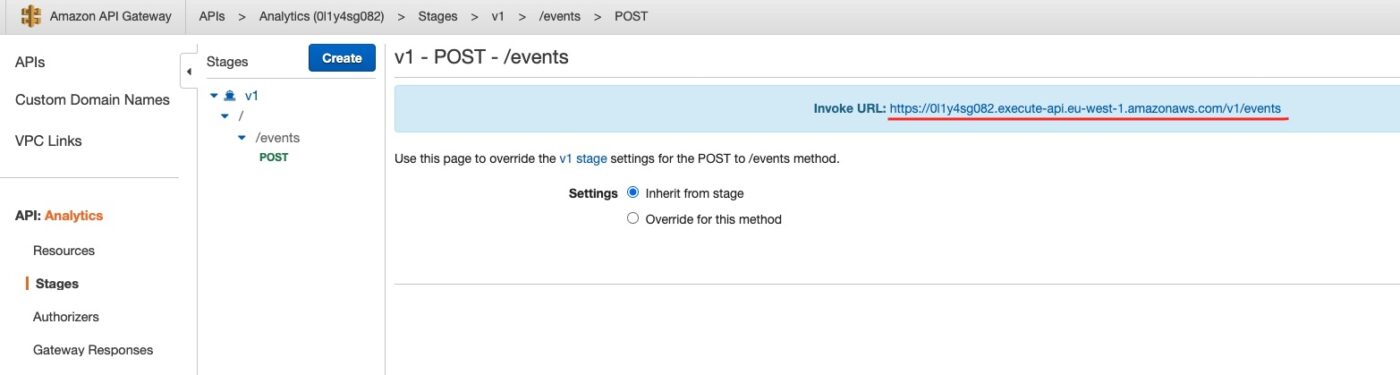
Then we call the curl command from our local machine as follows:
$ curl -v -X POST 'https://0l1y4sg082.execute-api.eu-west-1.amazonaws.com/v1/events' -H 'Accept: application/json' -H 'Content-type: application/json' -d '{"broadcastId": "123"}'On successful completion of the curl command we see this:
{"status":"200"}We Check Entry In Database Table
If everything has gone successfully, then we should have a new row inside our database table broadcasts. But, in order to confirm that we need to connect to our database using psql command line interface.
First, we have to connect to our EC2 client machine.
From the EC2 dashboard, we locate the EC2 machine and its public DNS name.
We then use that to connect with ssh from our local machine:
$ ssh -i ~/.ssh/me-ireland.pem ec2-user@ec2-34-247-194-193.eu-west-1.compute.amazonaws.comThen we have to take the endpoint URL for our database server and use it as argument to a psql call. We get this name from the RDS db instance dashboard, as we saw earlier.
We already know the username and the password. Hence we are able to issue the following command to get the contents of the broadcasts table:
$ psql -U postgres -h msk-demo-analytics.cpz5pn90qypo.eu-west-1.rds.amazonaws.com -d analytics_development -c 'select * from broadcasts;'The above command will ask you for the password (which is 12345678) and will print this:
 id |           broadcast_id           |          created_at
----+----------------------------------+-------------------------------
  1 | This is event for broadcast: 123 | 2023-01-22 13:01:10.143396+00
(1 row)
Perfect! And if we use the curl command from our local machine to send another event, then we will be able to issue the above psql command again to see a second row stored in the table.
Destroy To Avoid Further AWS Costs
To avoid being charged more than you want, make sure that you call Terraform to destroy all the 49 resources that we have created:
$ terraform destroy -var 'db_analytics={username: "postgres", password: "12345678", port: "5432", name: "analytics_development"}'Closing Note
That is the end of Part 8 and the end of the tutorial series Practical Terraform & AWS. It has been a long journey. We hope that this tutorial series was a good introduction of you to Terraform and AWS.
Contact Me
If you want to contact me to ask questions and provide feedback and comments, you are more than welcome to do it. My name is Panos and my email is panos@mixlr.com.