AWS API Gateway For Accepting Events

Part 1 – Objectives, Audience, Tools & Prerequisites
Part 3 – Using JavaScript Client To Produce and Consume Events
Part 4 – AWS Lambda Function To Produce Kafka Events
Part 5 – AWS API Gateway For Accepting Events
Part 6 – Consuming Events Using MSK Connect – S3 Bucket Sink
Part 7 – Consuming Events Using AWS ECS
Part 8 – Storing Consumed Events Into AWS RDS
Introduction
This is part 5 of the tutorial series Practical Terraform & AWS. In the previous part, we created an AWS Lambda function that can produce Kafka events. In the current, fifth part of the tutorial, we are creating an API REST endpoint using AWS API Gateway. The REST endpoint will allow us to use tools like curl , any REST client, to send the payload of the event that will be registered into the Kafka database and consumed by any consumer.
Important: If you follow along the steps suggested in this tutorial, you will probably be charged for the resources created in AWS. Make sure that, at the end of the learning experience, you run the necessary actions to destroy these resources, so that you are not charged for any reason. The command that we use, at the end of the process, to destroy the resources we create with this demo, is:
$ terraform destroyLet’s start.
Architectural Objective
The following diagram depicts the new element that we are going to add to our architecture, the architecture that we have started building up from the beginning of this tutorial series:

As you can see above, we are going to add an AWS API Gateway element that will expose a REST API endpoint. The implementation will be calling our lambda function that produces events.
Terraform Files
We continue describing our infrastructure using Terraform. In this part, number 5, of the tutorial series, we are going to add a new Terraform file called aws_api_gateway.tf.
This is the full list of Terraform files in our working directory:
- From Part 2:
client_machine.tflocals.tfmain.tfterraform.tfvarsvariables.tf
- From Part 4:
live_listening_event_producer_lambda_ecr.tflive_listening_event_producer_lambda_func.tfnull_resources.tfglobal_data.tf
- From Part 5 (current Part):
aws_api_gateway.tf
The full code of the file aws_api_gateway.tf is given below:
This is quite a big file. We are going to explain its contents part-by-part.
REST API
This is the main resource that all the other API-related resources will be built in. It is the resource for our API, an AWS API Gateway REST API resource.
It is very simple to define. We use the resource aws_api_gateway_rest_api. It requires a name and we also give the endpoint_configuration block in which we tell that the type of the API is an edge-optimized one. This is denoted with the value EDGE.
Other than that, we don’t forget to use the best practice of tagging this resource.
The Resource
Each AWS API Gateway REST API has one or more resources. A resource has a URL path and methods. It can possibly have nested resources.
Our resource above, has the path events and is a root/top-level resource of our REST API. That is why, the parent_id property refers to the Terraform resource of the root_resource_id of the REST API.
The rest_api_id needs to reference the REST API Terraform resource.
This is what we have defined so far:

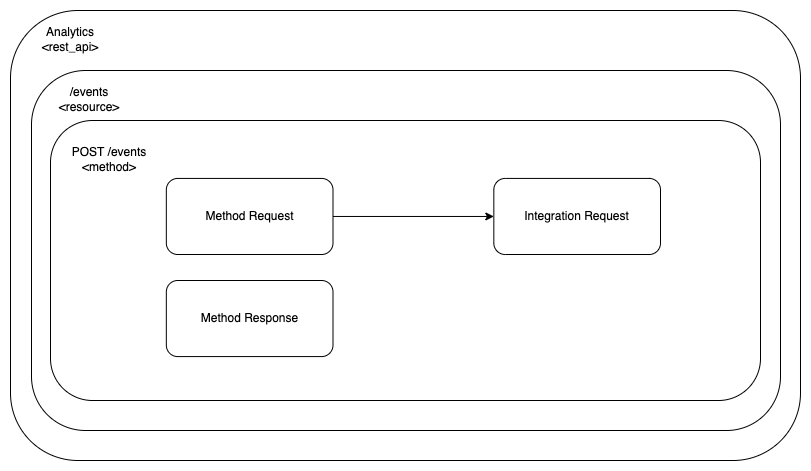
The Method Request
Each AWS API Gateway REST API Resource can have one or more Methods. Here is the one we define for our case:
We use the aws_api_gateway_method resource block to define it. Besides the fact that we need to link it with the REST API and the Resource, via the rest_api_id and the resource_id attributes respectively, we also define the http_method as POST. Moreover, for the purpose of this demo we will allow anyone to call this method’s endpoint, that’s why we set the authorization to NONE.
This is where we are with the configuration blocks:
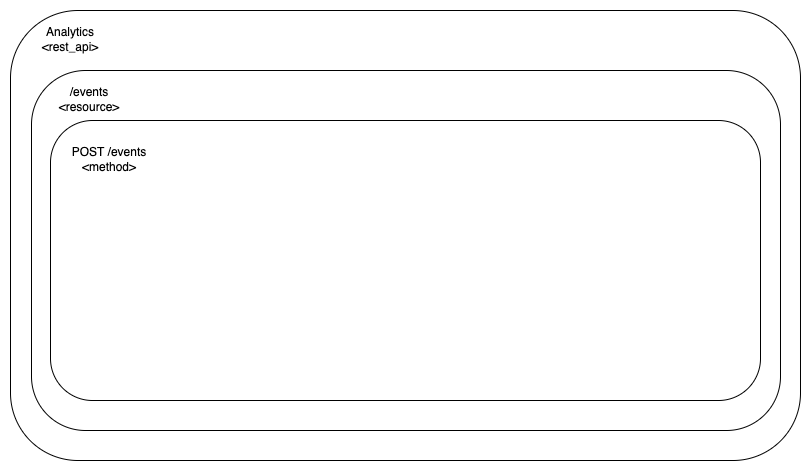
Note that if we want to be precise with the aws_api_gateway_method resource block, we have just defined the Method Request block of the whole REST API block setup.
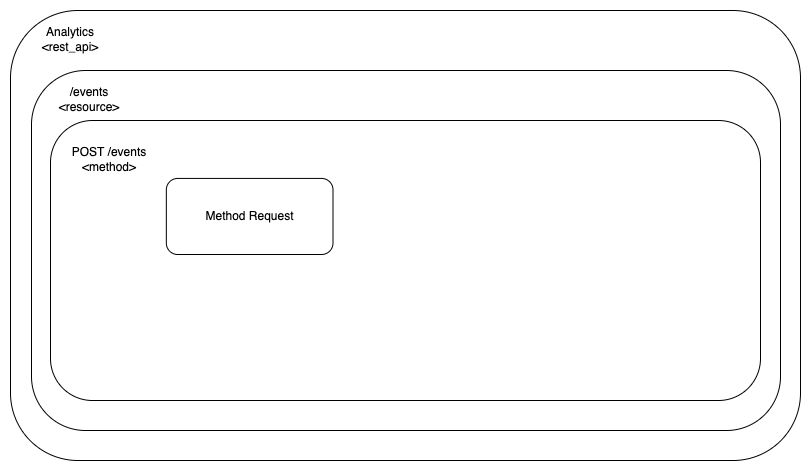
The REST API Resource specification is composed of the following 4 blocks:
- The Method Request, the one we just defined
- The Integration Request
- The Integration Response
- The Method Response
These blocks are chained together to build a HTTP request processing loop in a way that looks more or less like this:
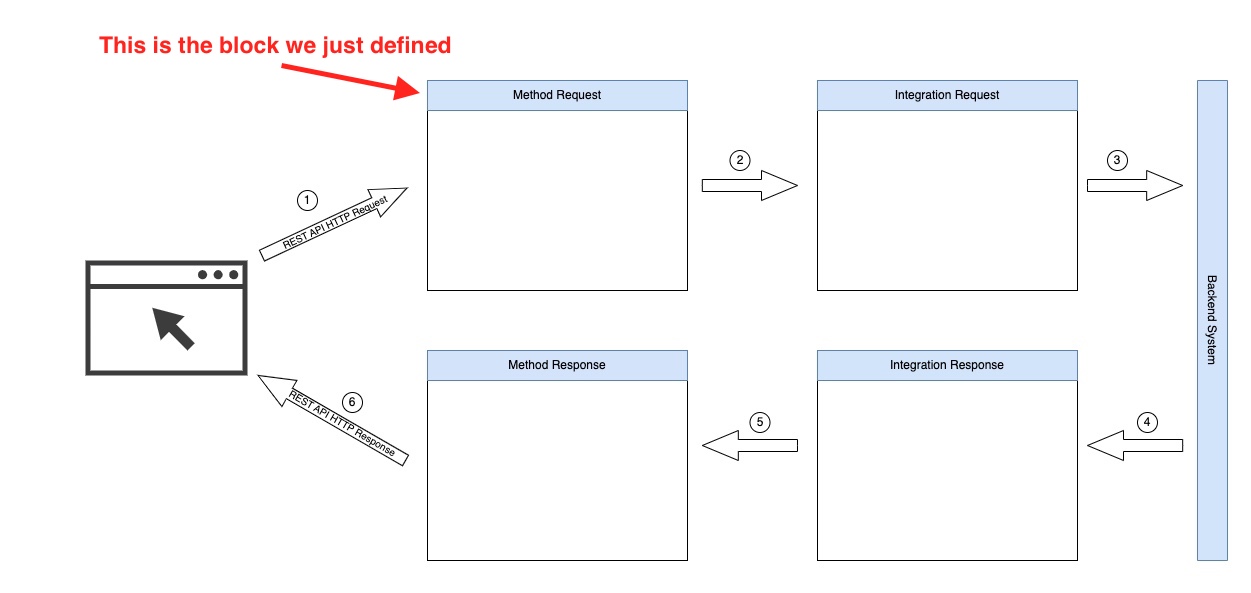
These blocks allow us to customize the way we implement our REST API endpoints. Note that the Backend System can be many different things. In our case, it is going to be our Kafka Producer implemented with an AWS Lambda from the previous, part 4, of the tutorial.
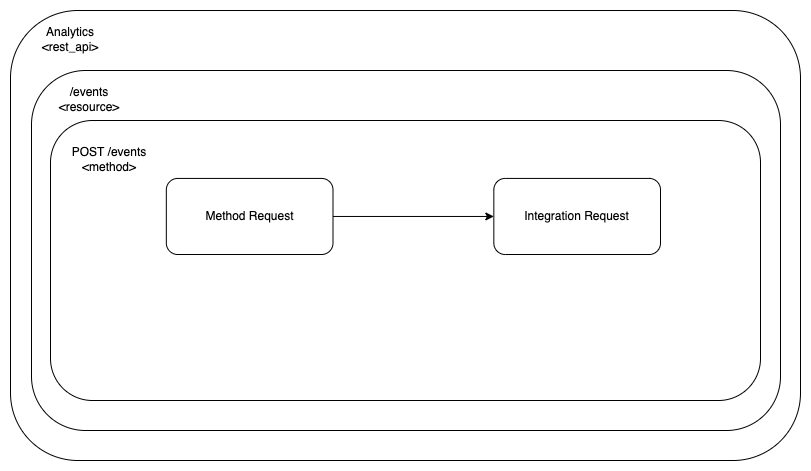
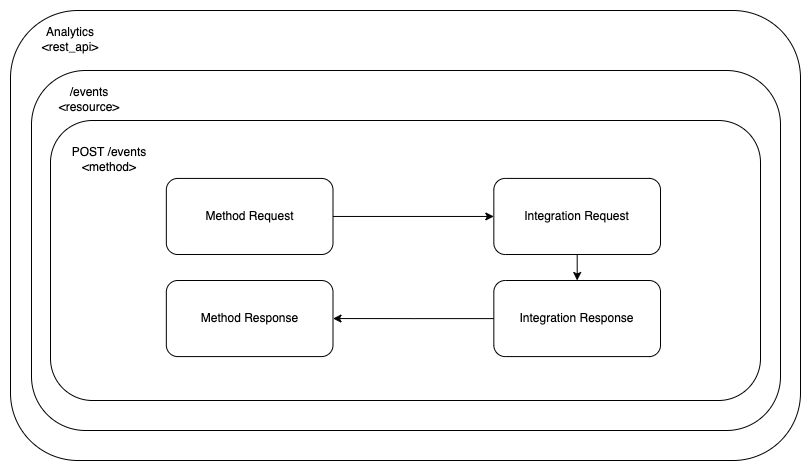
The Integration Request
We proceed to the Integration Request block. This is defined using the aws_api_gateway_integration Terraform resource:
The rest_api_id, the resource_id and the http_method are used to associate the integration request with the correct REST API -> Resource -> Method chain.
The type is set to be AWS because our backend is going to be an AWS Service, particularly, an AWS Lambda implementation.
The integration_http_method needs to have the value POST. This is the only method that is compatible with AWS Lambda backend. Note that the AWS API Gateway service is going to issue an HTTP POST request to the AWS Lambda Service in order to invoke a specific Lambda function.
The uri is necessary in order to denote which AWS Lambda function to be invoked. We reference the Terraform resource aws_lambda_function.live_listening_event_producer via its invoke_arn.
Having defined the aws_api_gateway_integration resource, this is where we are with the configuration blocks:
The Method Response
We continue with the Method Response block. In order to define it, we use the Terraform resource aws_api_gateway_method_response. This is the code snippet:
The rest_api_id, resource_id and http_method are used to associate this Terraform resource with the correct REST API and Method element.
We just define what the method response will be for the 200 HTTP Status code (by setting the status_code attribute). We keep things simple and we don’t specify any other kind of mapping or processing.
This is where we are at the moment:
The Integration Response
This block is supposed to be there to accept and process the response from the backend. We define it using the Terraform resource aws_api_gateway_integration_response.
The rest_api_id, resource_id and http_method are used to associate this block to the correct REST API Resource and Method.
The status_code is used to link to the correct Method Response.
The depends_on meta argument is guiding Terraform that this Terraform Resource, the integration response, has a dependency to another Terraform Resource, the integration request. According to the Terraform documentation this makes sure that the integration response is created after the integration request. We explicitly need this depend_on statement because we don’t have any attribute in integration response explicitly referring to the integration request in any other way.
This is where we are with the configuration blocks:
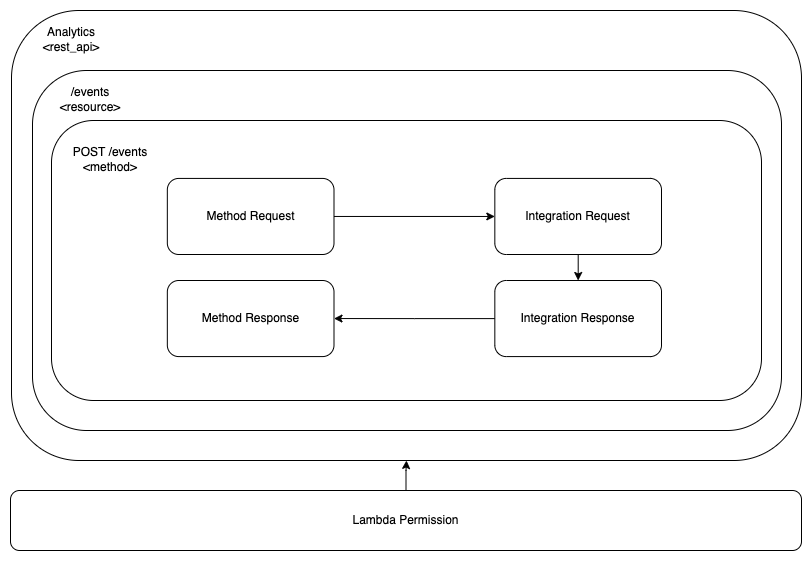
Lambda Permission
In order for the AWS API Gateway to be able to invoke our Lambda function, we need to explicitly allow it at the Lambda Permissions level.
We use the Terraform resource aws_lambda_permission.
The statement_id is a custom unique identifier for the permission statement. The action need to be lambda:InvokeFunction. The function_name specifies the Lambda function which we allow invocation for. The principal refers to the entity we give permission to. The source_arn associates this permission to our API Gateway instance. The /*/*/* part, allows invocation from any stage, method and resource path.
This is the diagram of the configuration blocks we have used so far.
Allow Writing To CloudWatch Logs
In order for our API implementation to be able to write to AWS CloudWatch Logs we will have to create the necessary resources, like the CloudWatch log group and the correct IAM role.
Here is what we have to implement:
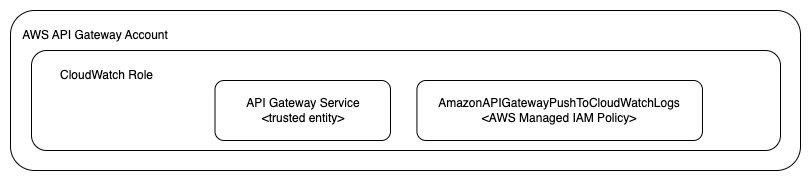
The IAM Role
The following block defines the IAM Role that will be later attached to the API Gateway account level:
As you can see, we defined that the API Gateway service is a trusted entity that can assume this role. Other than that, the tags are there to follow the best practice of tagging AWS resources.
The AWS Managed Policy
In order to refer to an existing resource, we use the data block.
The arn value is the ARN for the AWS Managed Policy AmazonAPIGatewayPushToCloudWatchLogs.
Associate Polity To Role
With the policy and the IAM role at hand, we only have to associate one to the other:
Attach Role To AWS API Gateway Account Level
Finally, we attach the role to the AWS API Gateway account level.
Stage Deployment
What is left to be done is to tell Terraform, and AWS, how our API is going to be deployed. API are deployed in stages. Hence, we need to define the stage configuration. But, the stage configuration depends on another meta configuration block, the deployment block which tells Terraform how to handle the deployment of a stage.
Deployment
Here is how we define the deployment:
The deployment is a snapshot of the REST API configuration. We will later link it to a stage so that it can be published to callable endpoints.
We use the triggers argument to tell which other Terraform resources define the configuration of the deployment, and that if any of these might ever change that a redeployment will be needed.
Moreover, we use the lifecycle meta attribute configuration block to tell that on each redeployment Terraform will first create the new instance(s) and then destroy the old ones. Hence, redeployments will be properly ordered.
CloudWatch Log Group
We create a new CloudWatch Log Group, specific to the API. Note that in the first part of this tutorial we have already defined another CloudWatch Log Group for our AWS MSK Cluster.
We pay special attention to the name attribute. It needs to have the specific pattern. Otherwise, AWS will create it automatically and we will end up having two CloudWatch Log Groups. In order to avoid having two CloudWatch Log Groups we start the name with API-Gateway-Execution-Logs_ and we attach the REST API id and the the stage name (see later on for it).
The Stage
We then define the stage that will eventually publish our deployment to a specific endpoint.
We associate this stage with the deployment via the deployment_id attribute.
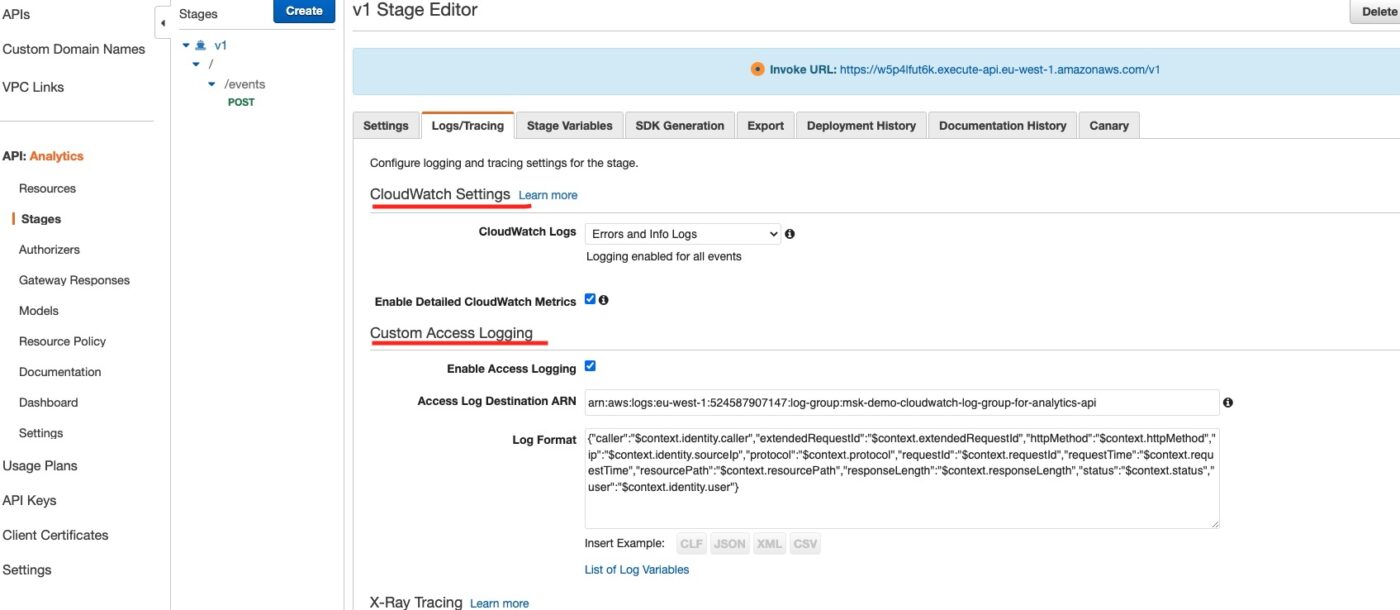
We enable Access Logging by configuring the corresponding settings. These settings include the reference to the CloudeWatch Log Group we want to use, as well as a format configuration. This format configuration was basically taken from the corresponding AWS documentation here.
We don’t forget to apply the best practice of tagging.
Stage Settings for All Methods
Finally, in order to finish the stage configuration, we use the Terraform resource aws_api_gateway_method_settings.
The value */* is used to tell that we want these settings for all the Methods of the stage.
We enable the metrics and the logging to level INFO, which is the level with enough information for informational and error messages but it is safe enough to not log sensitive information. We also enable throttling by setting limits for burst and rate. The burst is for limiting the concurrent requests, and the rate is the number of requests that can be accepted/served per second.
Deploy to AWS Account
We have our Terraform files ready. We can now tell Terraform to create this infrastructure in our AWS account.
Important: At this point and before we apply the terraform configuration, we should have prepared everything that Part 2 and Part 4 of this tutorial series is talking about. In fact, we should have the following files already edited with the correct content:
- From Part 2:
client_machine.tflocals.tfmain.tfterraform.tfvarsvariables.tf
- From Part 4:
live_listening_event_producer_lambda_ecr.tflive_listening_event_producer_lambda_func.tf
- From Part 5 (current Part):
- aws_api_gateway.tf
Terraform Apply
We invoke Terraform with the following command:
Important: Make sure that that you have Docker server running locally before you execute the next command.
$ terraform applyThis will present the plan of creating 30 resources (if our Terraform state is clean when we do) and then we respond with yes to fire the creation process.
It will take a lot of time to build the infrastructure due to the AWS MSK which takes from 30 to 90 minutes to be built. So, we have to be patient. At the end of a successful built process we will see the message:
Apply complete! Resources: 30 added, 0 changed, 0 destroyed.Double-Check Application Results
We already know how to check the resources of the infrastructure, like the AWS MSK cluster and all the other resources we learnt about in the previous parts of the tutorial. Let’s check that the AWS API Gateway has been built as expected.
We visit the AWS API Gateway in the AWS Management Console and we see that the Analytics API has been created:
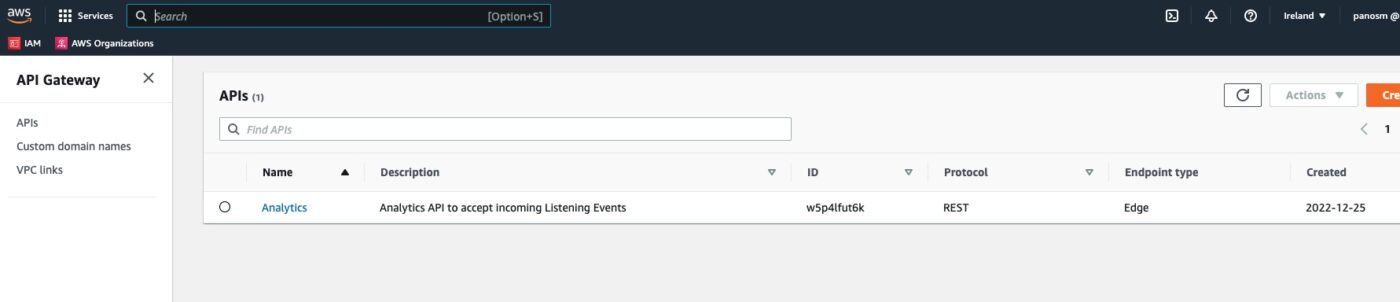
We click Analytics to go into its details:
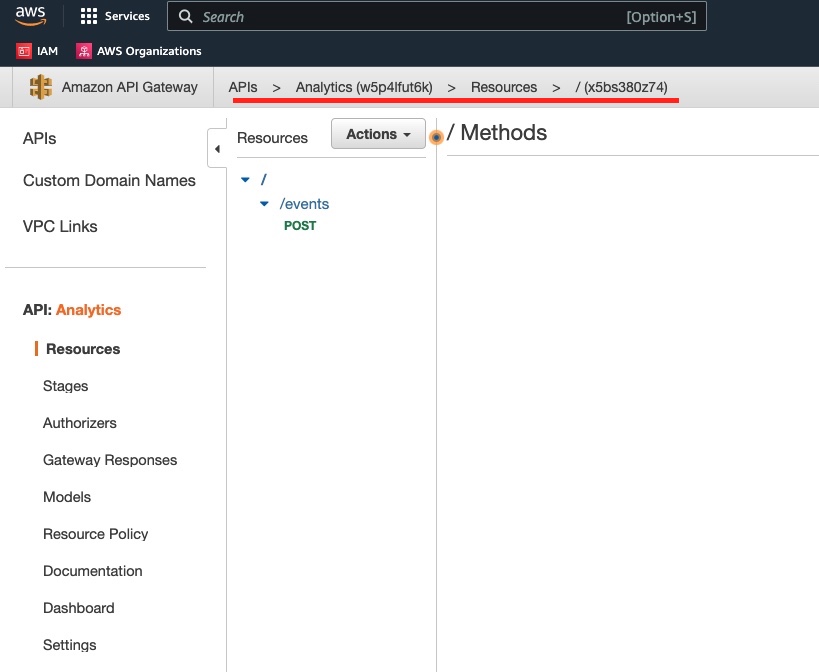
We click on the /events resource to see the methods defined for this resource:
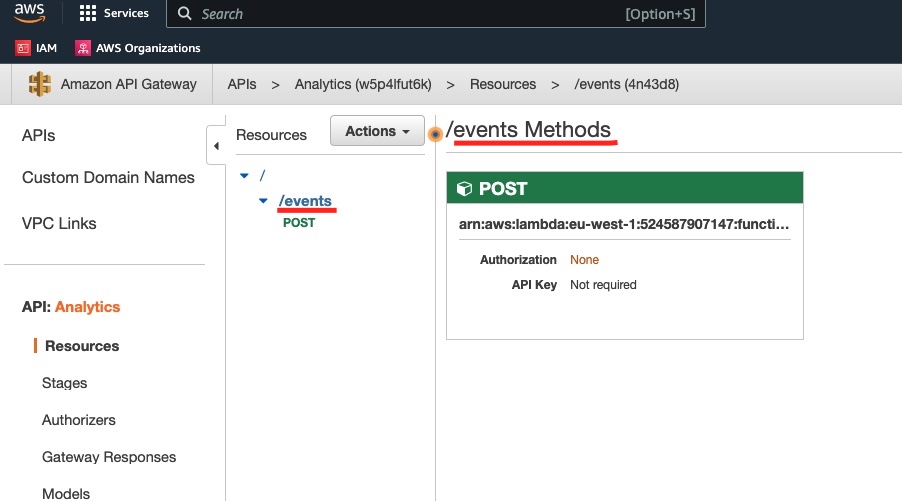
We click on the POST method to see its details:
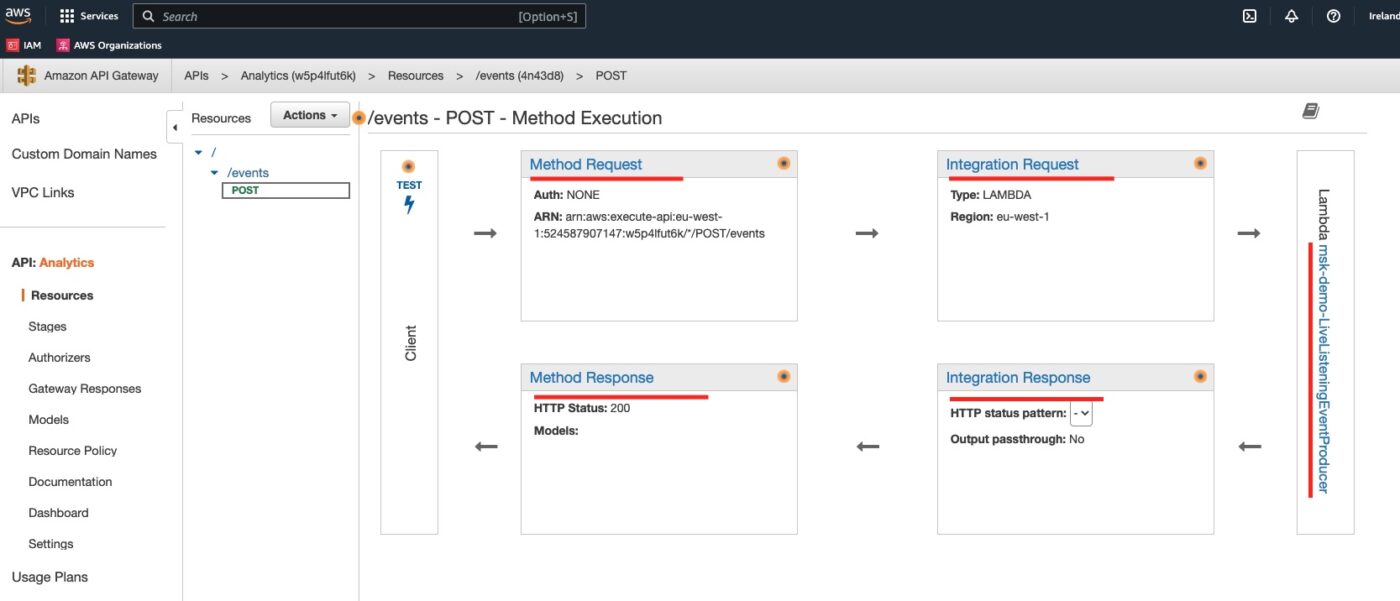
All the resources we have defined, Method, Integration Request, Integration Response and Method Response are here. We can also see the backend integration with our Lambda.
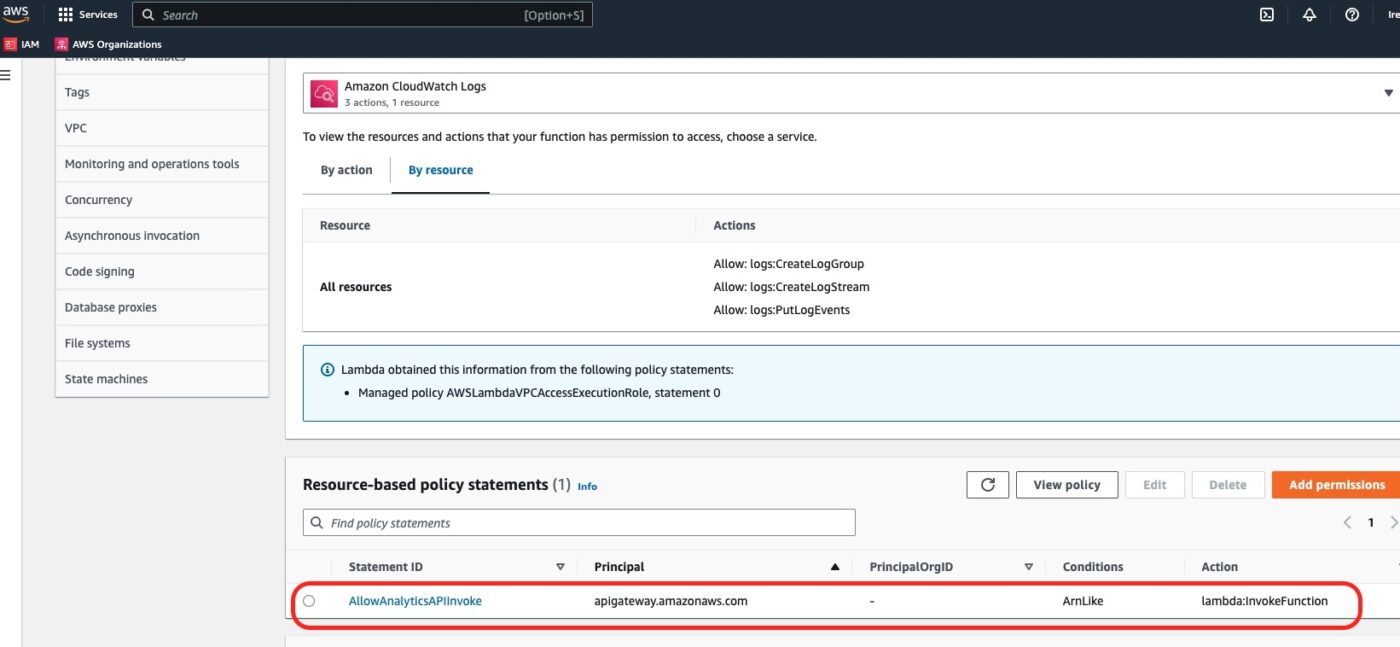
If we click on the Lambda function, then we go to Configuration tab and then to Permissions sub-tab, we will see, inside the Resource-based policy statements section, a Permission entry named AllowAnalyticsAPIInvoke. This is the permission we added with aws_lambda_permission Terraform resource:
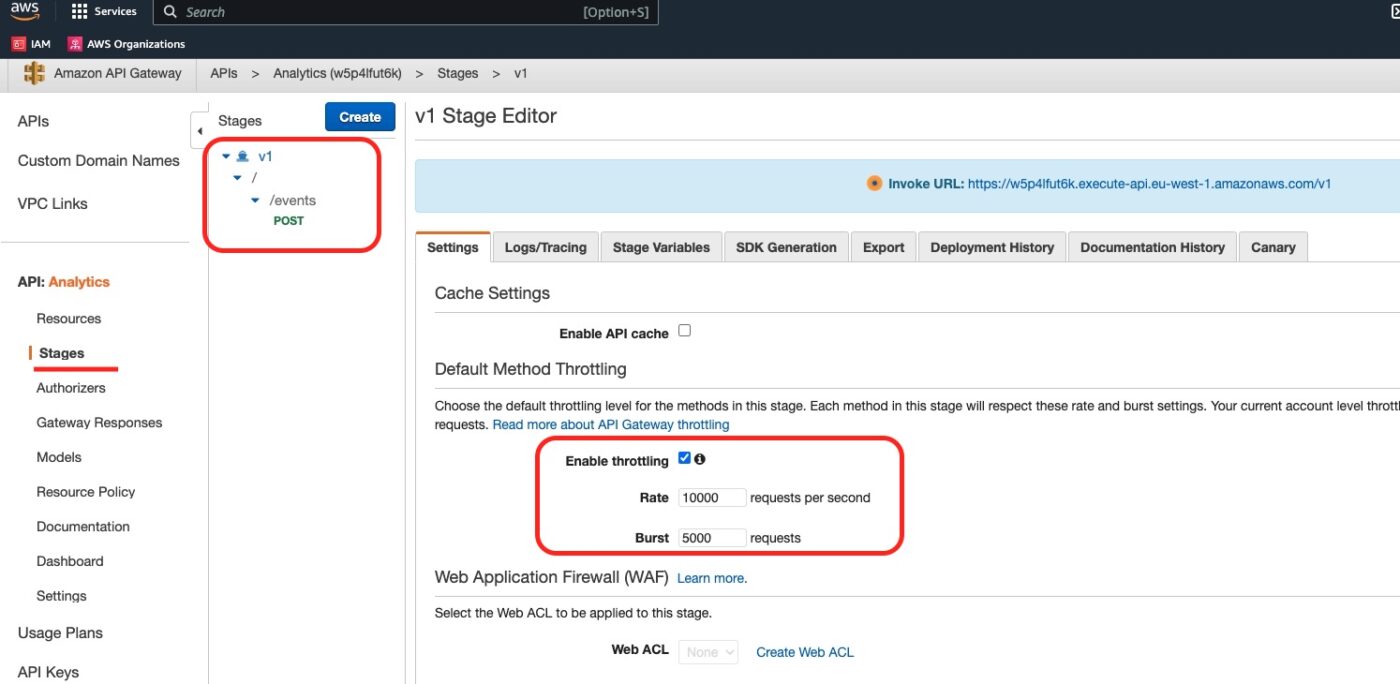
Back in the API Gateway Dashboard, we can click on Stages and we can see the results of the aws_api_gateway_deployment and aws_api_gateway_stage resources.
And in the Logs/Tracing we can see how we have enabled CloudWatch logs and Access Logging:
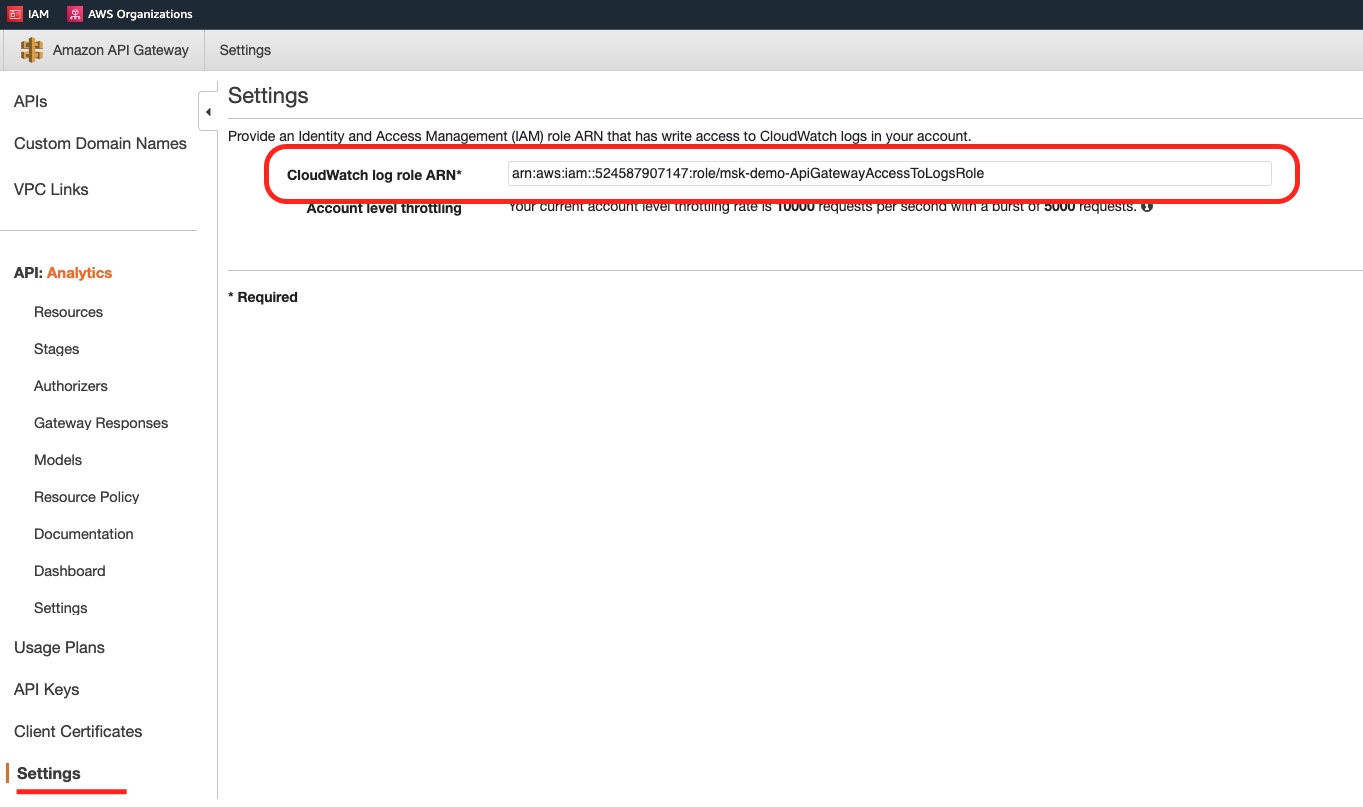
In the Settings menu option, at the AWS API Gateway account level, we can see how we have attached the necessary role that allows CloudWatch logging for all of our APIs:
Finally, the IAM Role we have created. We can see it from the IAM Management Console.

The IAM role with name msk-demo-ApiGateway/AccessToLogsRole is the one we created for the API Gateway needs. The other one, was already defined when we built the Lambda infrastructure.
If we click to see the details of this role, we will see:
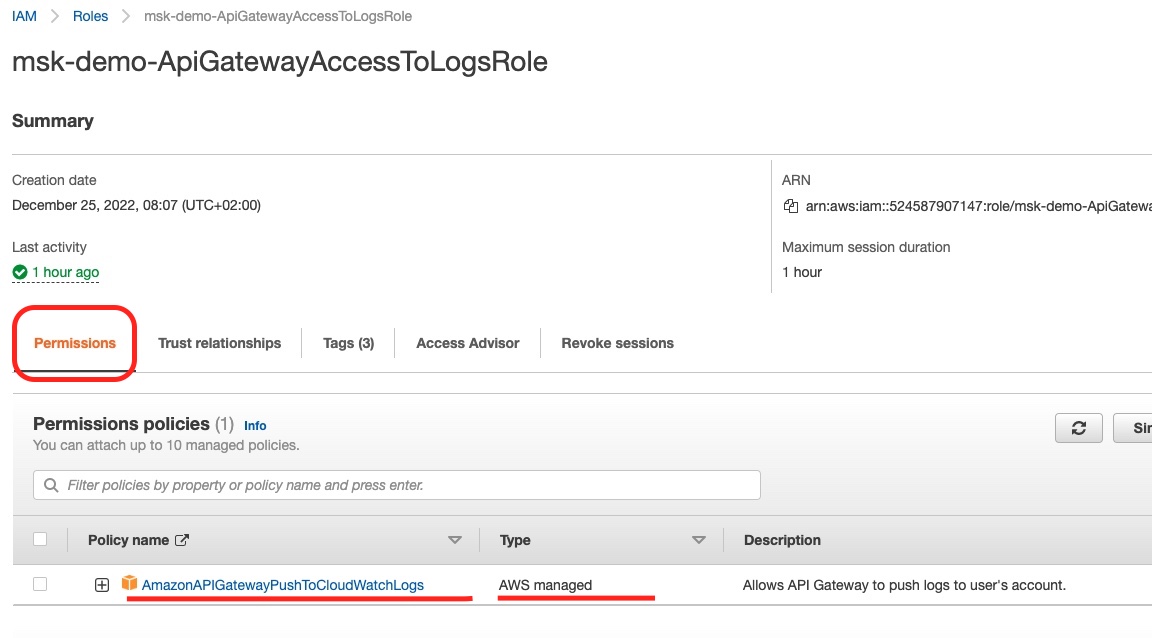
We can see the AmazonAPIGatewayPushToCloudWatchLogs permission policy attached to the role. This is the result of the aws_iam_role_policy_attachment Terraform resource.
And if we click the Trust relationships tab, we will see which Entities can assume this role:
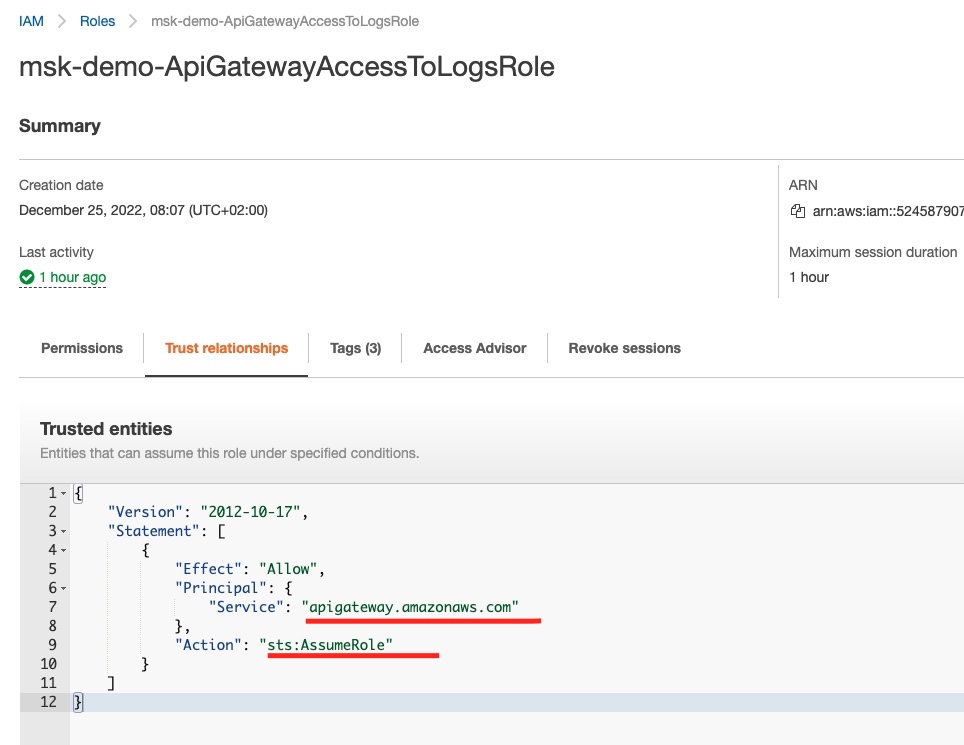
We can see that the API Gateway service can assume this role and hence can write to the CloudWatch logs. This registration is the result of the aws_iam_role assume_role_policy we have defined in our Terraform file for the api_gateway_access_to_logs role.
Hence, everything seems to have been created as expected. Now let’s try to test it both via the AWS API Management Console and using a curl command.
Test Endpoint
We are going to test our REST API deployment and implementation.
Connect to our EC2 Client Machine
We locate the EC2 client machine connection command and we execute it in one of our local machine terminals:
$ ssh -i ~/.ssh/"me-ireland.pem" ec2-user@ec2-52-215-204-180.eu-west-1.compute.amazonaws.comCd to Kafka Installation Folder
Then, while in the EC2 client machine we change directory to the Kafka installation folder.
$ cd kafka_2.13-3.2.0/Start Kafka Console Consumer
We can start the Kafka console consumer:
$ ./bin/kafka-console-consumer.sh --bootstrap-server ${KAFKA_BROKERS} --consumer.config ./bin/client.properties --topic ${TOPIC_NAME} --from-beginningThe above command will start the Kafka console consumer and will wait for events to be published. For every event that is published it will print a line with the details of the event.
Trigger Test on Endpoint Using AWS Management Console
We leave the Kafka Console consumer running and we go back to the AWS API Gateway management console. We select the method POST and we see a Test option:
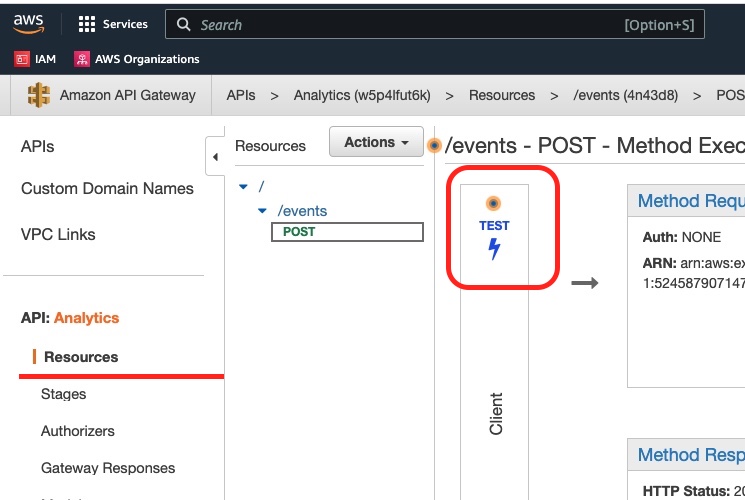
We click the Test button and we go to the Test console:
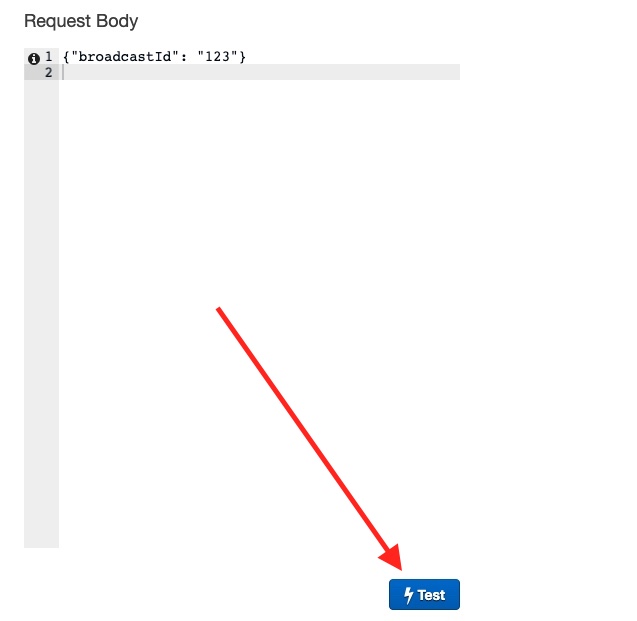
This is where we fill in the Request Body with a sample content like this:
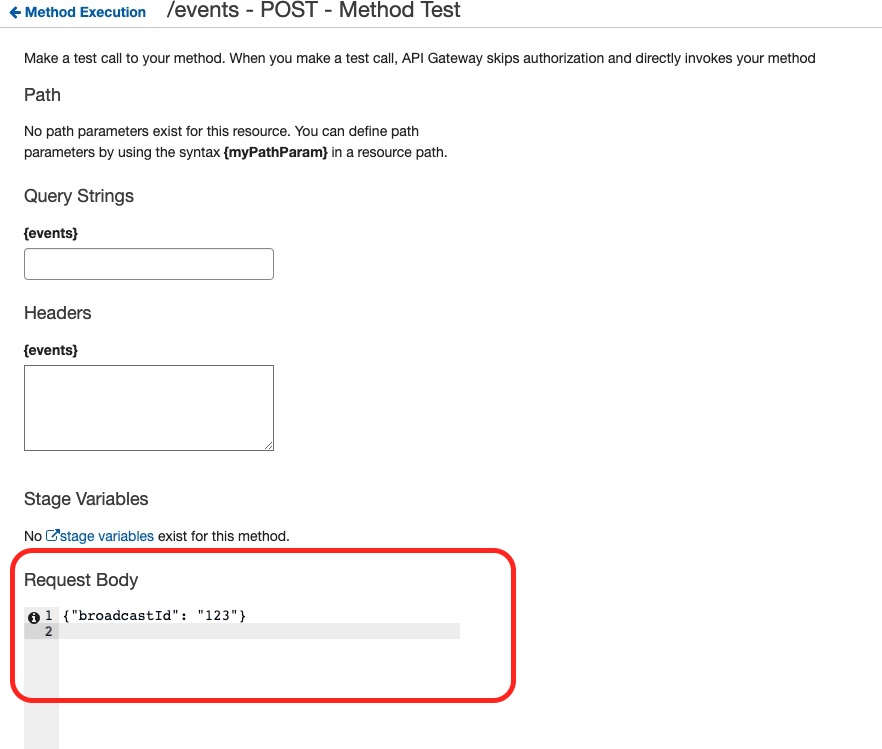
Then we click on the Test button:
If everything goes well, we see this:
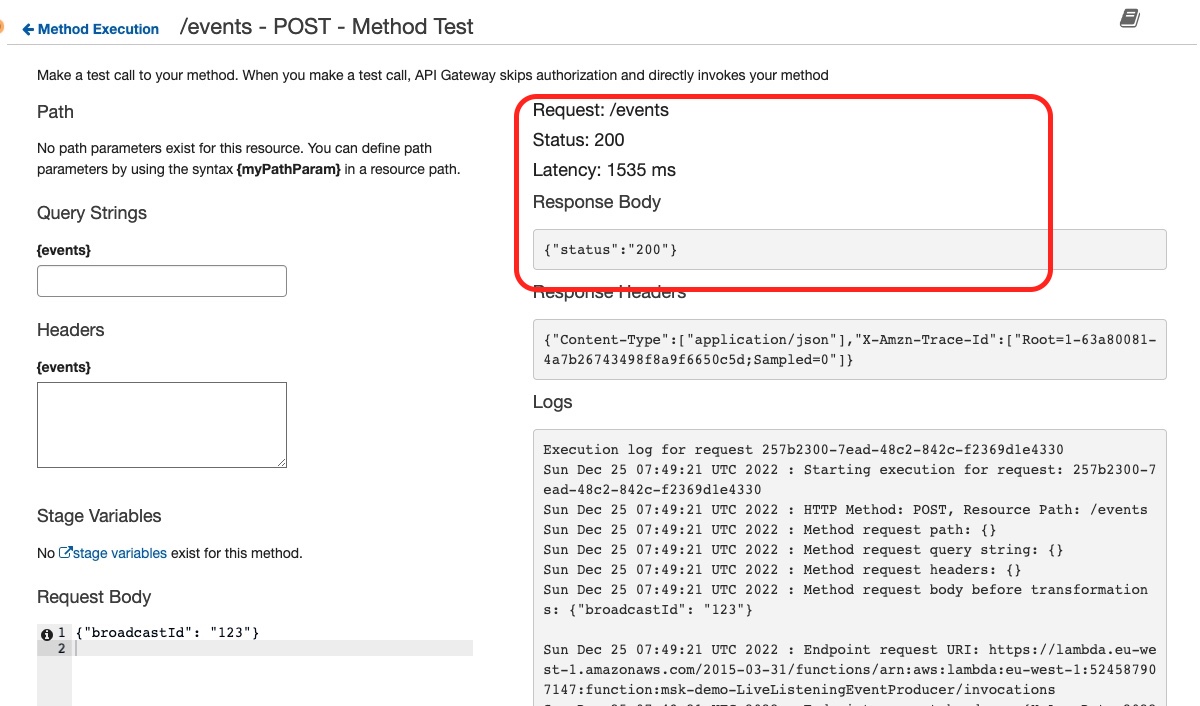
which means that the API has been successfully called.
Finally, we confirm that our event has been stored in Kafka and consumed by our Kafka Console consumer, by looking at the logs in the Kafka Console consumer terminal:

Well Done! Our REST API seems to be working as expected!
Test Endpoint Using curl
Finally, we can issue a curl request and test the whole chain again. For the curl command we will need the endpoint behind our REST API /event POST method. We can get it from the API stage dashboard as it is explained in the following picture:
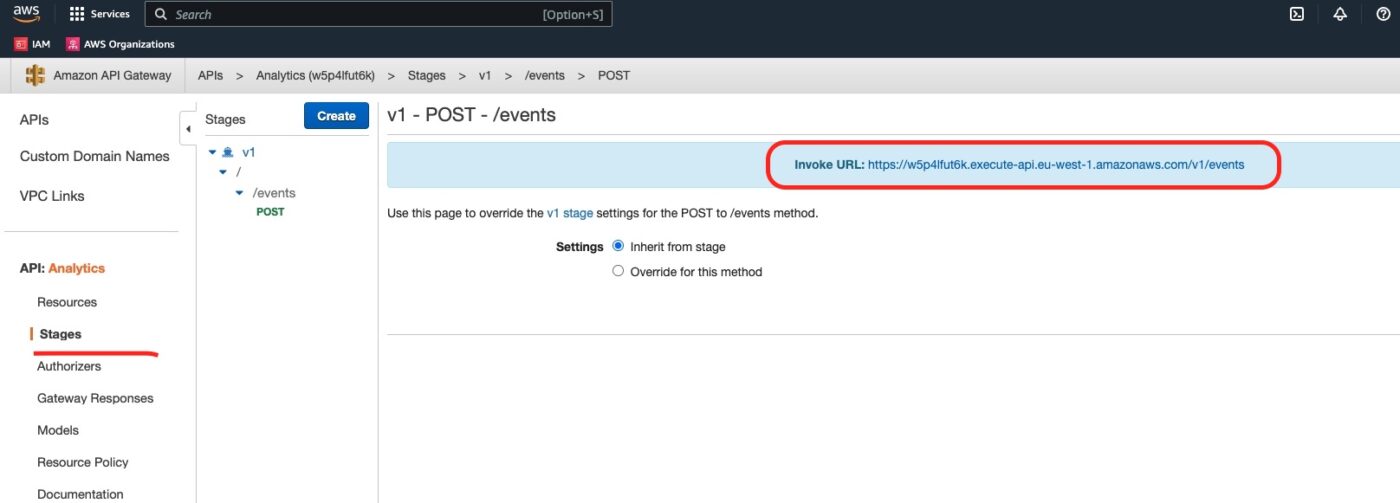
Copy the Invoke URL and use it in the curl command as below. You can issue this command from your local development machine. You don’t have to issue it from the EC2 client instance. The endpoint is publicly available.
$ curl -v -X POST 'https://w5p4lfut6k.execute-api.eu-west-1.amazonaws.com/v1/events' -H 'Content-type: application/json' -H 'Accept: application/json' -d '{"broadcastId": "234"}'As soon as we issue the above command, we go to the Kafka Console consumer terminal again. We see a new line having been logged:

Congratulations! Every works as expected!
Destroy To Avoid Further AWS Costs
To avoid being charged more than you want, make sure that you call Terraform to destroy all the 30 resources that we have created for this part of the tutorial:
$ terraform destroyClosing Note
That is the end of Part 5 of the tutorial series Practical Terraform & AWS. We will continue with the sixth Part Consuming Events using MSK Connect – S3 Bucket Sink.
Contact Me
If you want to contact me to ask questions and provide feedback and comments, you are more than welcome to do it. My name is Panos and my email is panos@mixlr.com.