Objectives, Audience, Tools and Prerequisites

Part 1 – Objectives, Audience, Tools & Prerequisites
Part 3 – Using JavaScript Client To Produce and Consume Events
Part 4 – AWS Lambda Function To Produce Kafka Events
Part 5 – AWS API Gateway For Accepting Events
Part 6 – Consuming Events Using MSK Connect – S3 Bucket Sink
Part 7 – Consuming Events Using AWS ECS
Part 8 – Storing Consumed Events Into AWS RDS
Introduction
We would like to welcome you to the Practical Terraform & AWS tutorial series of blog posts, produced by Mixlr.
At Mixlr, we serve millions of users every day. In order to achieve this, we maintain a big and complex infrastructure of machines and networks. As part of the maintenance and operations of our infrastructure, we use, amongst other tools, Terraform to define every piece of it, practicing the IaC technique. Moreover, a very big part of our infrastructure is hosted in AWS. Hence, to provision the AWS items that we need, we use the AWS Terraform Provider.
The Practical Terraform & AWS series of blog posts has 8 posts that will take you to a journey of setting up AWS items and building up a serverless application. The demo application that we will build, it will be accepting an incoming message, or event, and will be processing it in a couple of different ways. Basically, it will internally implement the Publish – Subscribe architectural pattern, using Apache Kafka as the core element of storing the messages.
Learning Objectives
The main learning objectives of the series are:
- Learn how to write Terraform configuration files to provision elements to AWS
- The main AWS elements that we will provision are:
- AWS MSK Cluster
- AWS RDS, a database instance
- AWS API Gateway REST API
- AWS Lambda functions
- AWS IAM Roles and Policies
- AWS CloudWatch Log Groups
- AWS ECR Repository
- AWS ECS Service with Tasks inside AWS ECS Cluster
- AWS VPC
- AWS Internet Gateway
- AWS Subnets
- AWS EC2 Instance
- AWS S3 Buckets
- AWS VPC Endpoint
- AWS MSK Connect
- Learn how to integrate Docker with Terraform
- Learn how to Produce and Consume Apache Kafka messages
- Learn how all these elements are interconnected.
Audience
The tutorial series is addressed to Junior level software and devops engineers, or other tech savvy people who would like to get familiar with IaC tools and AWS.
- They need to be comfortable working with the command line in a terminal window.
- They need to be able to write a program using the JavaScript programming language.
Tools & Other Prerequisites
In order to follow along the hands-on parts of the tutorial series, the reader needs to have the following tools ready:
- Latest version of Terraform installed locally, in their laptop.
- An AWS Account. They need to have signed up and have a valid AWS account. Note that the practical actions that we will take, they will incur some charges to the billing method that the AWS account will be linked with.
- The
aws cliinstalled locally. Also, they need to configure it so that it can have access to the AWS account. - Latest version of Node.js installed locally. They may want to install and use the Node Version Manager for easier installation and management of different Node.js versions.
- Latest Classical version (1.X) of Yarn installed locally. They may want to use Corepack to manage the different versions of Yarn installed in their local machine.
- Latest version of Docker, which will be used to build and push container images.
- Latest version of
curl, which is used to issue HTTP requests to remote servers.
Other tools that the reader might find useful are:
- An IDE that understands Terraform and JavaScript. We use Visual Studio Code.
gitto keep track of the progress with checking checkpoints.asdfas the universal tools version manager.
AWS Account User Roles and Privileges
While we execute the Terraform commands to create the AWS resources, we use a non-root AWS account. We don’t want to use the root account because this is considered a bad practice for security reasons.
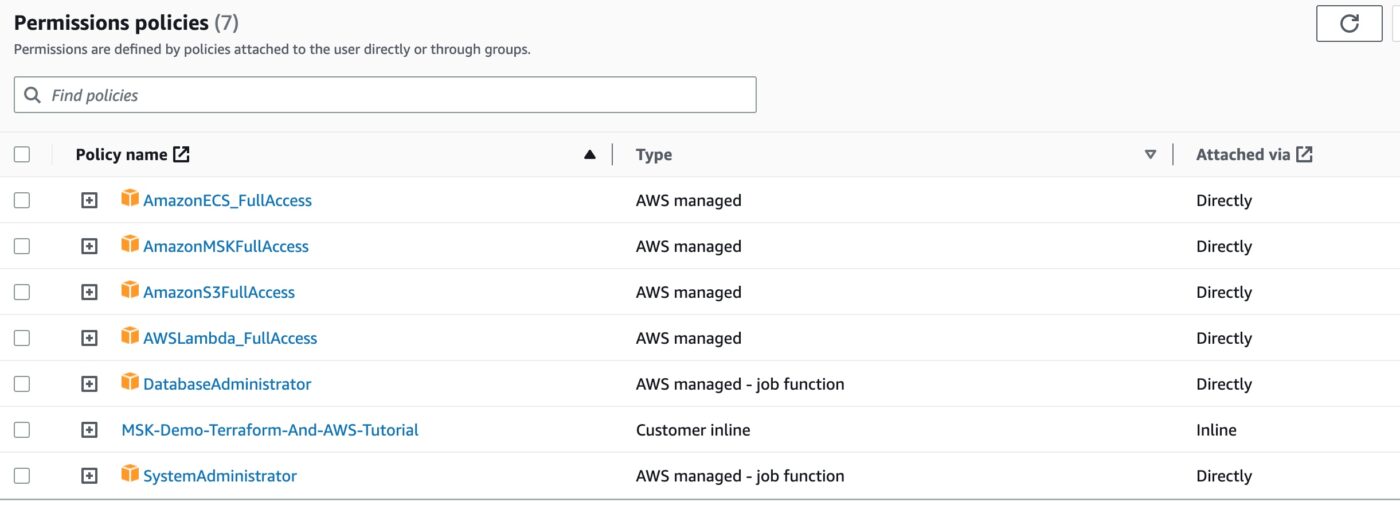
However, the user we use needs to have the appropriate IAM Permission Policies attached.
Make sure that you go to your IAM Management Console, create a User and attach to it the Permission Policies that you see below. When you create the User, make sure you keep a note of its AWS_ACCESS_KEY_ID and AWS_SECRET_ACCESS_KEY because you will need them to create the AWS profile in your local machine as part of the aws cli configuration.
Here is a screenshot of the Policies this user needs to have.

As you can see from above, all of them, except one, are already present in the pool of AWS managed policies. Hence, you only have to locate them and attach them to the Permissions Policies of the user. The Policy with name MSK-Demo-Terraform-And-AWS-Tutorial is the only Policy that you have to define as a Customer inline Policy with the following JSON content:
Watch out though, you have to replace all the substrings <your-account-id> of the above JSON content with the account id of your AWS account.
Contact Me
If you want to contact me to ask questions and provide feedback and comments, you are more than welcome to do it. My name is Panos and my email is panos@mixlr.com.
Closing Note
We are ready to start. We move to the Part 2 of the tutorial series, Setting Up AWS MSK, in which we design and deploy an AWS Managed Service for Kafka, using Terraform.
